The events grid can also display Hebrew dates. To cause the events grid to display Hebrew dates, add "show_hebrew=1" to the link to the events page. i.e. events.php?show_hebrew=1
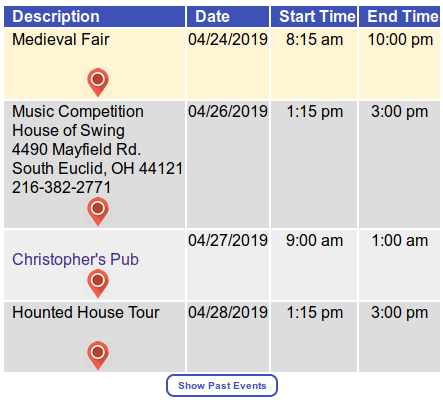
By default, the events grid will not show dates in the past. If you want to show past dates, you must set the past dates override, i.e. events.php?show_past=1
You may also setup events to be private to a single user or to a group. To do that, add the following parameters to your URL: user_table, UserID, and AccessLevel. You may also add use_logged_in_credentials to your URL and set its value to 1. If you send use_logged_in_credentials, then the variables user_table, UserID, and AccessLevel determine which of the credentials are used from the logged-in session to filter the events using and AND comparator. i.e. if user_table and UserID are set, then all events with the user UserID from the table user_table will be selected, but not the same UserID from another user_table. If you set use_logged_in_credentials to 1, then you would set any or all of user_table, UserID, and AccessLevel to 1 rather than any actual values where 1 or set = use, and not set = don't use. The formula for this is:
(user_table) AND (UserID) AND (AccessLevel) where any one or two of these variables may be ommitted.
An example of a complete URL might be:
events.php?show_past=1&user_table=1&AccessLevel=1&UserID=1
If use_logged_in_credentials is not set, then user_table, UserID, and AccessLevel are handled in a different manner. Instead, the values passed in these variables may be used explicitly, instead of those of the logged in session. You may also specify 1 for any of these to use the user_table, UserID, or AccessLevel of the logged in session. This allows you to mix and match any of these parameters with what is specified in the URL with what is set in the logged in session. These credentials are also combined somewhat differently. i.e., if all three variables user_table, UserID, and AccessLevel are passed, then all events assigned to users of user ID UserID, and all users of access level AccessLevel from and only from the user table user_table will be shown. If only UserID, and AccessLevel are passed, then events assigned to user UserID, or with access level AccessLevel will be selected reguardless of which user table they may be in. The basic formula is:
(user_table) AND ((UserID OR (AccessLevel) where any one or two of these variables may be ommitted.
If for some reason you desire to display your events grid from lastest at the to to oldest at the bottom, simple add descending=1 to your URL. An example of a complete URL might be:
events.php?show_past=1&user_table=accounts_form&AccessLevel=user&descending=1
You can change the colors, fonts, etc. for your events grid using the styles editor by selecting Calendar and Events Styles from the style sheet list shown it the main menu by clicking Edit Styles. Go to Editing CSS for more information on editing styles.
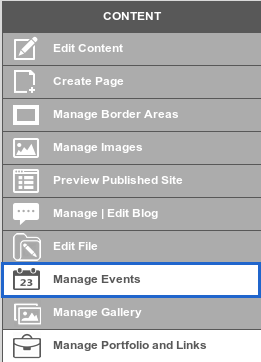
To open the calendar grid, go to CONTENT and click the Manage Events button as seen in the picture above.
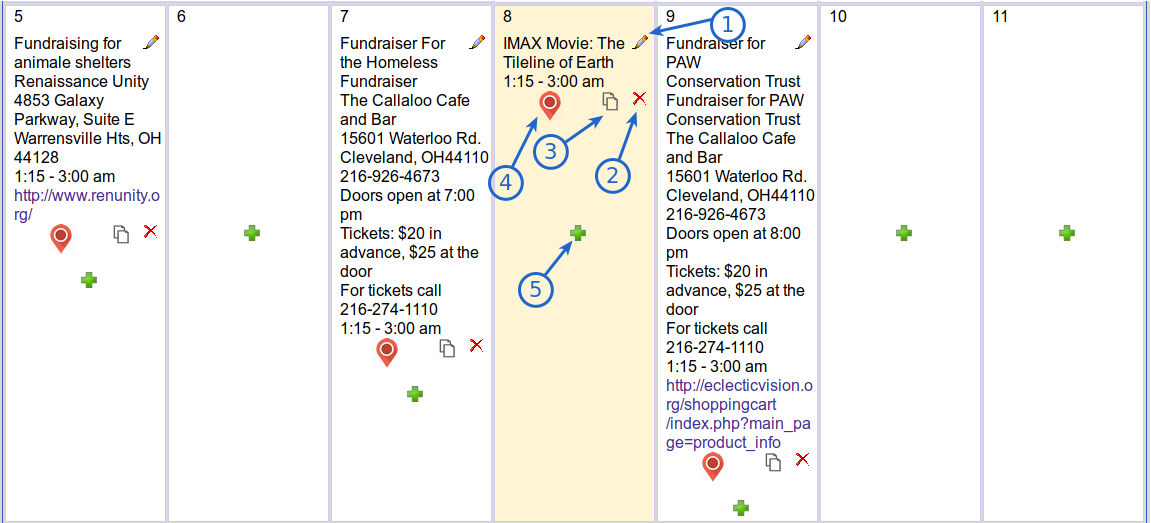
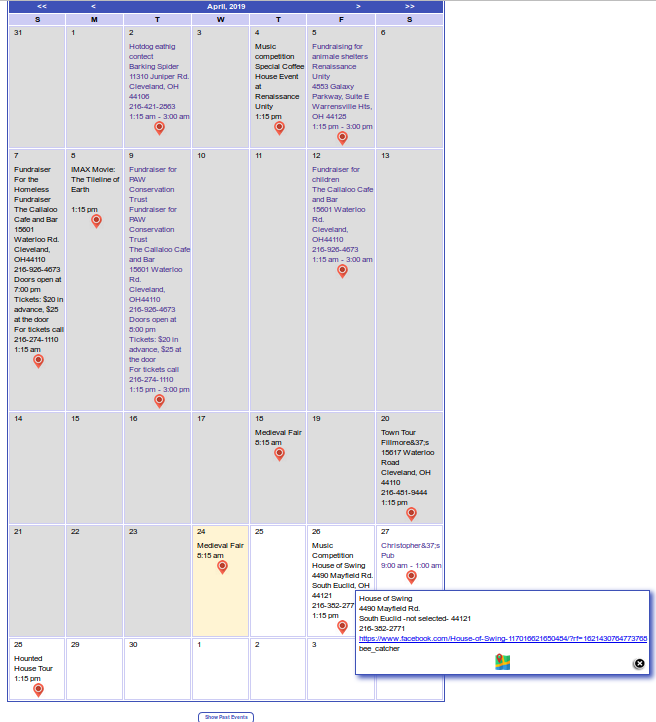
Each cell in the calendar may have five icons or more that can be clicked on to access the following functions: (images above):
(1) Clicking on the pencil will open the event in the event editor.
(2) Clicking on the X will allow you to delete the event.
(3) Clicking on the copy will allow you to copy an event. This will bring up and edit window with a copy of the event clicked on except the date is blank
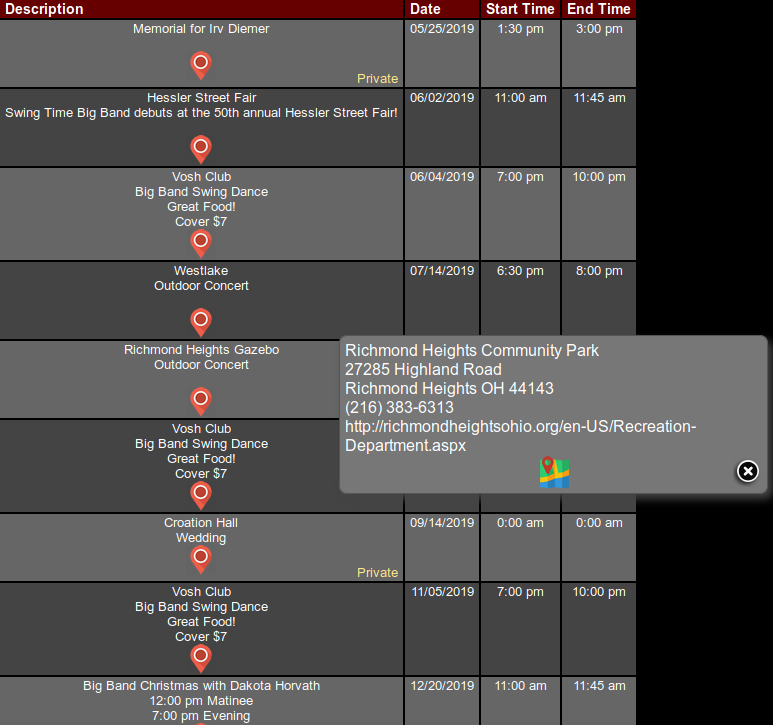
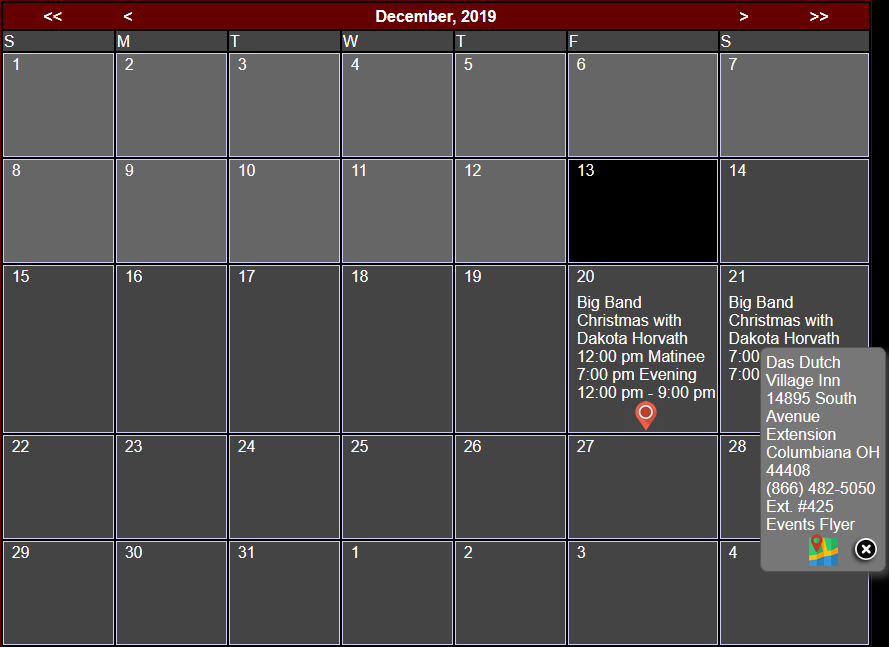
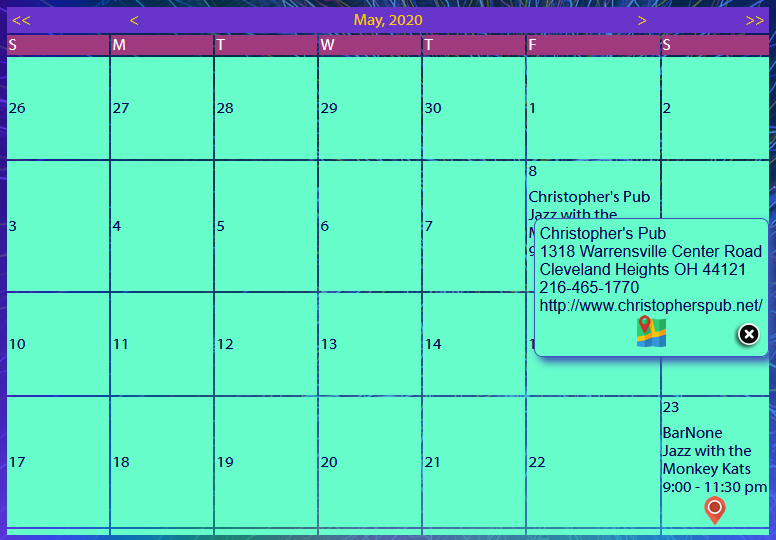
(4) Clicking on the mapping popup will provide you with the location info box. The location info box displays the location address and contact info, a map icon and a close popup button. Clicking on the map icon will open a new window with a map to that location.
(5) Clicking on that icon will allow you to add a new event. The event editor will open with only the date filled in with the calendar date you clicked.
Calendar Buttons

At the bottom of the calendar are several buttons:
(1)This button allows you to manage all locations that are on file. For more info click here.
(2) This button allows you to manage all categories that are on file. For more info click here.
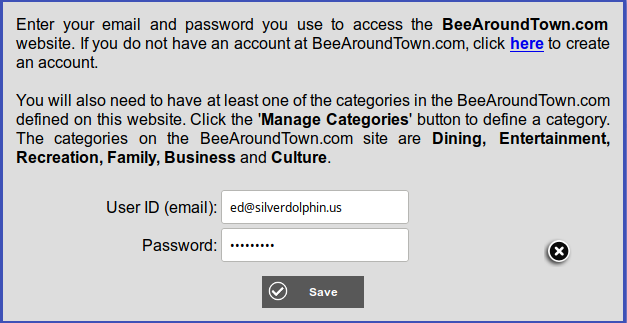
(3) This button allows you to add credentials for communicating with the Bee Around Town website.
(4) This button allows you to add a new event.,
(5) This button allows you to search for and edit an existing
event.
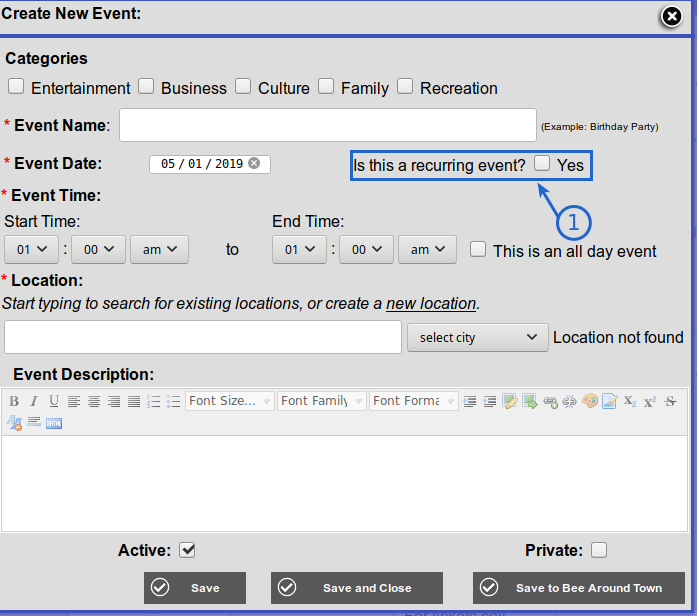
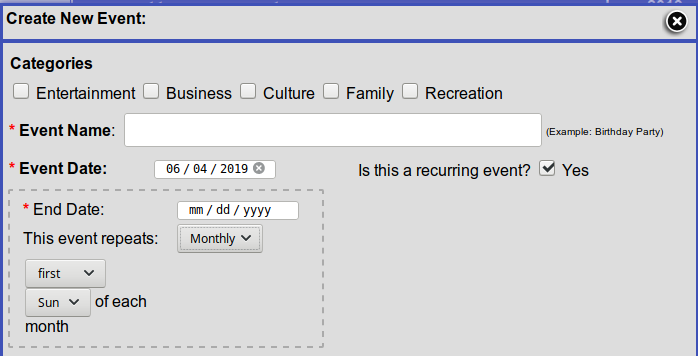
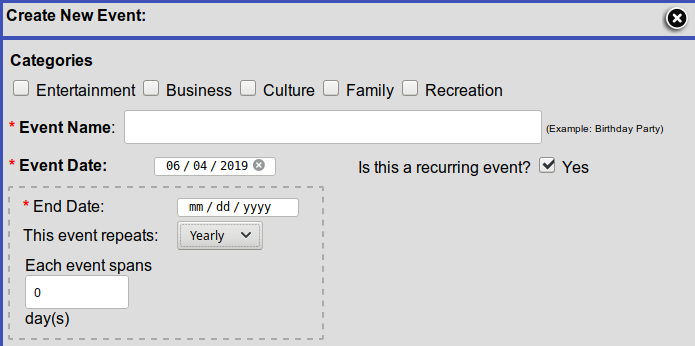
For recurring events (1)the check mark the blue box below.
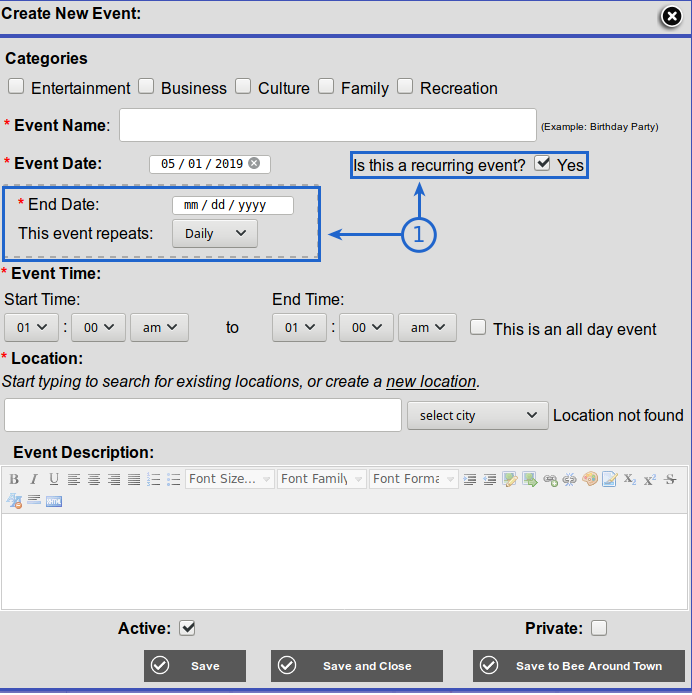
Once the check mark is clicked, an new slot will appear for when this event repeats as seen below.
If you chose Daily for the enent repeats combo box see below.
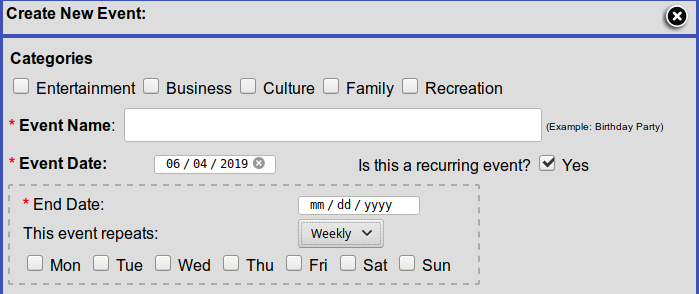
If you chose Weekly for the event repeats combo box see below.
If you chose Monthly for the event repeats combo box see below.
If you chose Yearly for the event repeats combo box see below.
To enter BeeAroundTown.com you must enter your user ID and password. If you do not have an BeeAroundTown account then click here to create an account on BeeAroundTown. Enter the BeeAroundTown login credential and click save.
Manage Categories
The image below is the page for managing your categories :
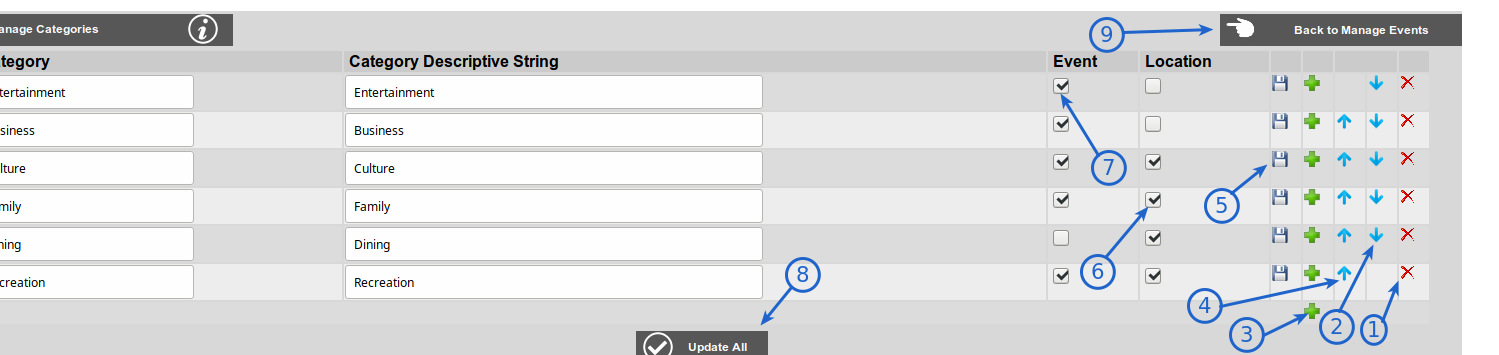
(1) Click the X icon to delete the the category in that row.
(2) Click the down arrow to move the display order down a row.
(3) Click the + icon to add a new display order below the row you are on.
(4) Click the up arrow to move the display order up a row.
(5) Click the save icon to save any changes to the contents of that row.
(6) Check this to mark this category as a location category.
(7) Check this to mark this category as a event category.
(8) Click update all to update all rows
(9) Click the back button to go back to the event manager.
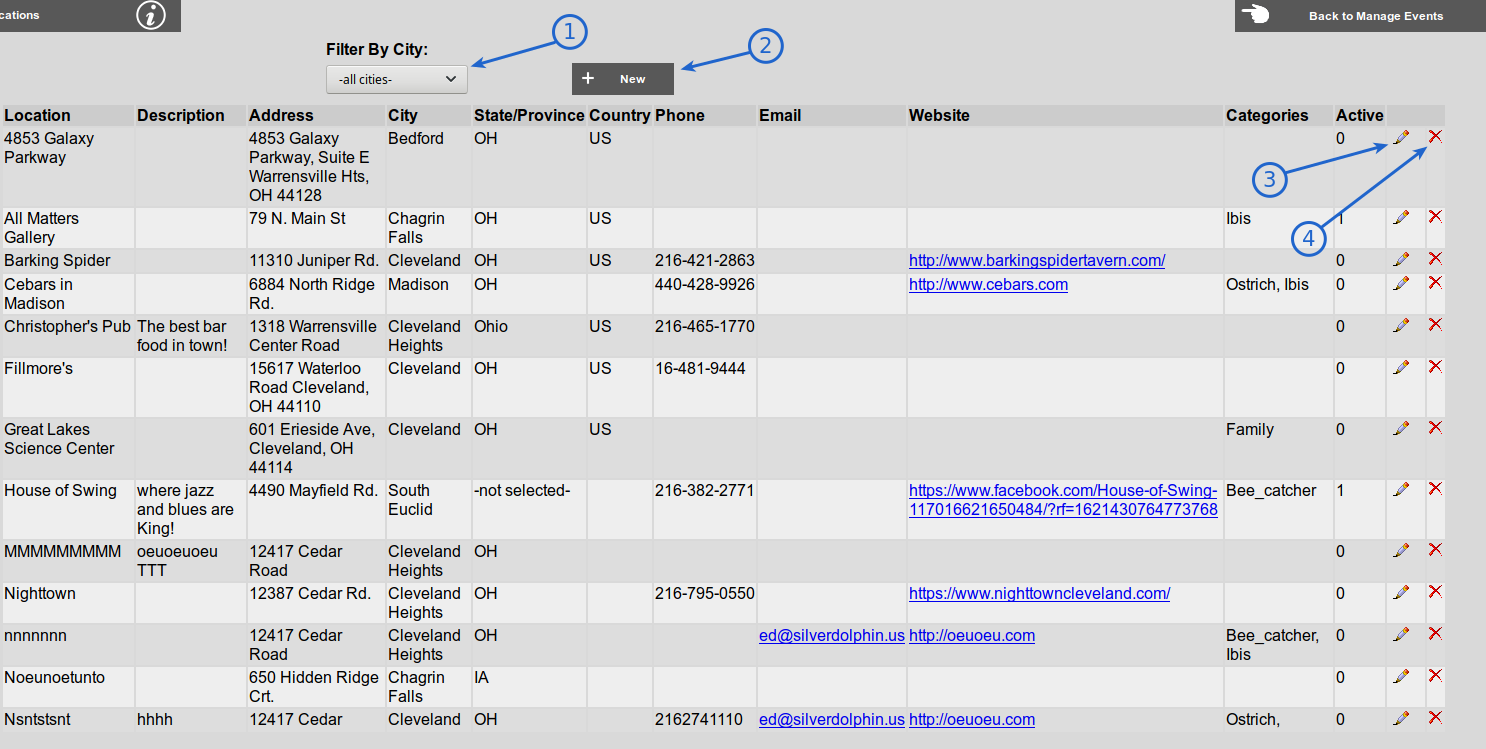
The image below is the page for managing your locations :
(1) Select a city to filter rows by city.
(2) Click New to create a new location.
(3) Click the pencil icon to edit location in that row.
(4) Click the delete icon to delete the location in that row.
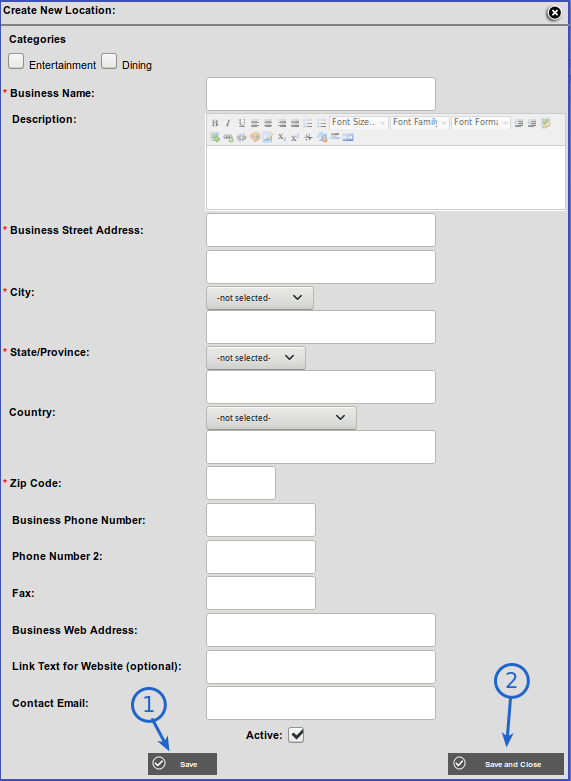
The Image below is a popup of the location editor that will show up when you click on option number 2 from the image above :
(1) Click save to save your location.
(2) Click this to save your location and close the location editor.
(3) This combo box contains names of citys that you have already saved. If the name of the city you are looking for is not there, then you can type it out in the text box below (3).
(4) This combo box contains the names of all 50 states of the united states. If the name of the provinces you are looking for is not there, then you can type it in the text box below (4).
(5) This combo box contains a list of all the countrys in the world.
Below are two examples of how the calendar can be modified by using CSS. The style sheet to open Calendar and Event Styles
To learn how, click here
By default, the calendar grid shows one calendar grid for one month with navigation links across the top to display other months across the top. Clicking on the month/year in the header toggles the view between displaying only one month and all of the months that contain events. Showing all of the months is particularly useful if the user would like to print the entire calendar with all months that contain events. You may make all-months view the default by adding show_all=1 to the link to the calendar page. i.e. calendar.php?show_all=1
The calendar grid can also display Hebrew dates. To cause the calendar grid to display Hebrew dates, add show_hebrew=1 to the link to the calendar page. i.e. calendar.php?show_hebrew=1
Hint: If you want to make a printable calendar or event grid, create a new page with the calendar plugin or the event plugin with the basic layout. Then switch to Source view and paste this code between the content separators:
<!-- WYSIWYG Encapsulation. Modify HTML inside of these comments only. All code outside of these comments is discarded. -->
<script language="JavaScript" type="text/javascript">
window.print();
</script>
<!-- WYSIWYG Encapsulation. Modify HTML inside of these comments only. All code outside of these comments is discarded. -->
Then, on the webview calendar or events page, put a link to the print calendar or web page. You can use the link tool to create a popup page selecting tool bars/no tools bars width, height, etc as you like. If you would like the calendar to print all pages, just use the show_all=1 switch as shown above.
You may also setup events to be private to a single user or to a group. To do that, add the following parameters to your URL: user_table, UserID, and AccessLevel. You may also add use_logged_in_credentials to your URL and set its value to 1. If you send use_logged_in_credentials, then the variables user_table, UserID, and AccessLevel determine which of the credentials are used from the logged-in session to filter the events using and AND comparator. i.e. if user_table and UserID are set, then all events with the user UserID from the table user_table will be selected, but not the same UserID from another user_table. If you set use_logged_in_credentials to 1, then you would set any or all of user_table, UserID, and AccessLevel to 1 rather than any actual values where 1 or set = use, and not set = don't use. The formula for this is:
(user_table) AND (UserID) AND (AccessLevel) where any one or two of these variables may be ommitted.
An example of a complete URL might be:
calendar.php?show_past=1&user_table=1&AccessLevel=1&UserID=1
If use_logged_in_credentials is not set, then user_table, UserID, and AccessLevel are handled in a different manner. Instead, the values passed in these variables may be used explicitly, instead of those of the logged in session. You may also specify 1 for any of these to use the user_table, UserID, or AccessLevel of the logged in session. This allows you to mix and match any of these parameters with what is specified in the URL with what is set in the logged in session. These credentials are also combined somewhat differently. i.e., if all three variables user_table, UserID, and AccessLevel are passed, then all events assigned to users of user ID UserID, and all users of access level AccessLevel from and only from the user table user_table will be shown. If only UserID, and AccessLevel are passed, then events assigned to user UserID, or with access level AccessLevel will be selected reguardless of which user table they may be in. The basic formula is:
(user_table) AND ((UserID OR (AccessLevel)) where any one or two of these variables may be ommitted.
An example of a complete URL might be:
calendar.php?show_hebrew=1&user_table=accounts_form&AccessLevel=user&UserID=Joe
You can change the colors, fonts, etc. for your calendar using the styles editor by selecting Calendar and Events Styles from the style sheet list shown it the main menu by clicking Edit Styles. Go to Editing CSS for more information on editing styles.