
The top section of the Manage Style Sheet Attributes console has the features shown below:
Clicking on any of the style sheets on the left will populate the attributes in the right panel. Initially, your style sheet won't have any attributes and those fields will remain black. Upon filling in enough information to satisfy any one of the three attributes, the Update button will be enabled. To aid in finding the style sheet you want to set attributes for, you may also sort them alphabetically by checking the Sort alphabetically checkbox.
The Charset attributes will add the @charset rule to your style sheet. You may select any of the ISO charset standards from the dropdown list. UTF-8 is very popular and is often the default on most web servers.
The Import attribute will add the @import rule to your style sheet. @import takes a URL to other style sheets as its only parameter. Google often provides special fonts as URL's to their font style sheets.
The Media attributes adds the @media rule to your style sheet. The syntax for @media is:
What the @media rule does, is apply the styles within the rule to the specified media type. The first dropdown list contains not, only or just blank which is the implied default of any. The second dropdown contains the four media types, All, Print, Screen and Speech. The dropdown after the word "and" contains the list of media features as specified in CSS3 to further specify your media type. The media feature value format depends on the media feature. For example, if you select height for the media feature, the value can be 200px, or 20%. If you selected color, the value could be #F00 for the color red. For more information on the @media rule, click here. It is important to note that you do not have a choice as to where the enclosing brackets go in the style sheet due to limitations with this interface. The @media rule will encompass the entire style sheet. To specify CSS for a different media type, you will need to create a new style sheet. The bottom half of the Manage Style Sheet Attributes console is shown below:@media not|only mediatype and (media feature) {
CSS-Code;
}
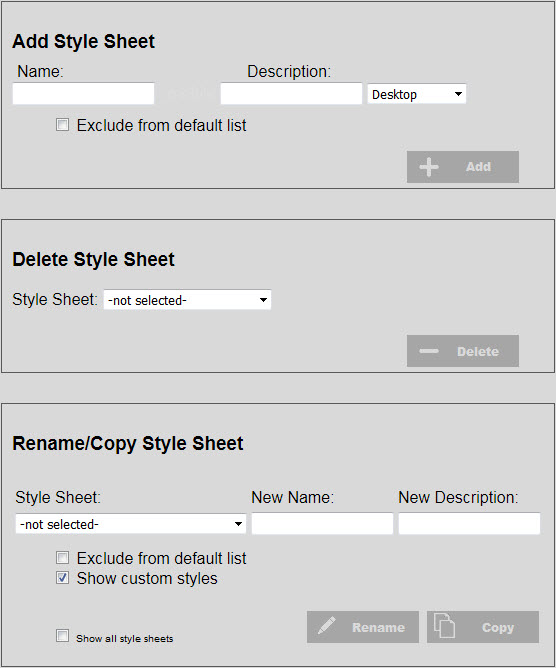
To add a style sheet, enter the name of your style sheet under Name. (All lower case, use underscores in place of spaces.) Enter a description under Description. The select Desktop, Mobile, Touchscreen or All. Note that if creating a mobile style sheet, you will not need to append _mobile to your style sheet name as this will be done automatically. Selecting ALL will create standard desktop, mobile and touchscreen style sheets. Note: Obviously, all mobile devices also have touchscreens. Touchscreen style sheets are used on devices that have touchscreens but are NOT mobile, such as kiosks and tablets.
The Exclude from default list checkbox allows you to create a style sheet that will not be included on all of the pages automatically. This is handy if you have a large style sheet that you don't want loading unless the page needs it, or if there are styles in this page that conflict with styles from other sheets. To put a style sheet created with this checkbox checked on a page, you will need to add a link of the form:
<link rel="stylesheet" href="css/my_style_sheet.css" type="text/css">
to a custom head created for the specific page where my_style_sheet is whatever the name of your style sheet is. You may need to create the new custom head for the page and described in Managing Head Content.
To delete a style sheet, simply select the style sheet you want to delete and click Delete. You will get one confirmation popup which will allow to you continue or cancel.
To rename or change the description of a style sheet, select the style sheet you want to rename and change description from the list. The Name and Description fields will fill in automatically. Change the name and/or the description and click Rename. If you want to copy a style sheet, enter a new name and description and click Copy. You may also set or unset Exclude from default list as described above.
If you want to use the custom style sheet editor (editing CSS in code view as opposed to the buttons and knobs interface) check the Show custom styles checkbox.
Checking the Show all style sheets checkbox will add all of the built-in and plugin style sheets to the style sheet list that are not added through this interface. You will not be allowed to change the names of these style sheets, but you can revise the description, exclude them from the default style sheet list in your web pages, and turn on or off the ability to use the custom style sheet editor (code view).

You can set the style sheet sort order using the console shown above. This is not intended for display purposes in the Breeze Website Builder. It has a far more important purpose. The style sheets are loading into your website pages based on this sort order. This console gives you the ability to change the order in which they load. This can be very handy when trying to resolve issues of two different style sheets loading the same class with different attributes. Whenever there are tow or more conflicting styles, which ever style loads last is the one a browser will use. Ultimately, you do not want conflicting styles; however, you may not be able to locate them. This console can be used to help you isolate such issues.