A plugins may be designed to include any combination of the following code insertions into your page: HTML/JavaScript in the head of the page, PHP into the head of the page, HTML/JavaScript into the body of the page, and/or PHP into the body of the page. In the last case, a special provision is included to overcome an editing limitation you could otherwise run into. By default, any content you place into the page using the Breeze Website Builder will appear above the PHP code. A special pre-defined string is used as a separator that will allow you to put content below the PHP code if so desired. To do this, place <!-- Page Content Divider --> inside of your content using Source view in the editor. The content following the <!-- Page Content Divider --> will appear after the PHP code.
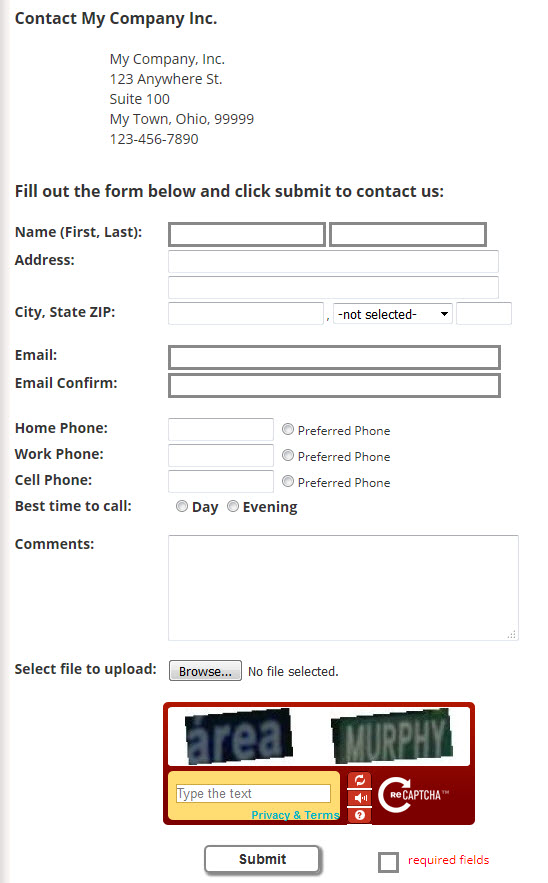
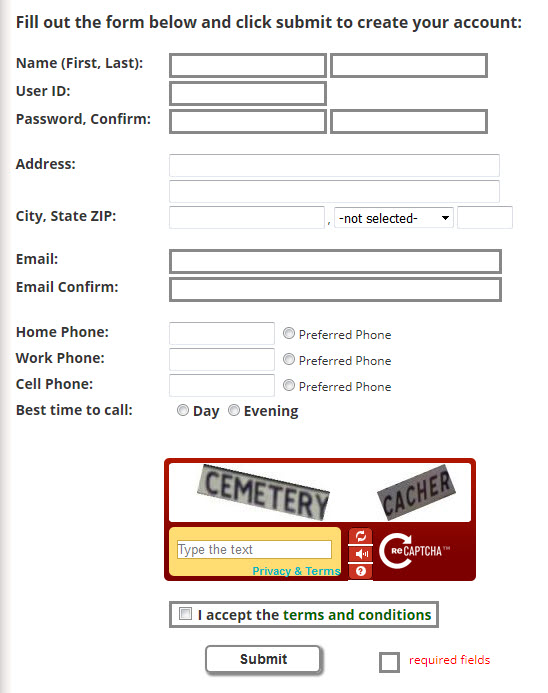
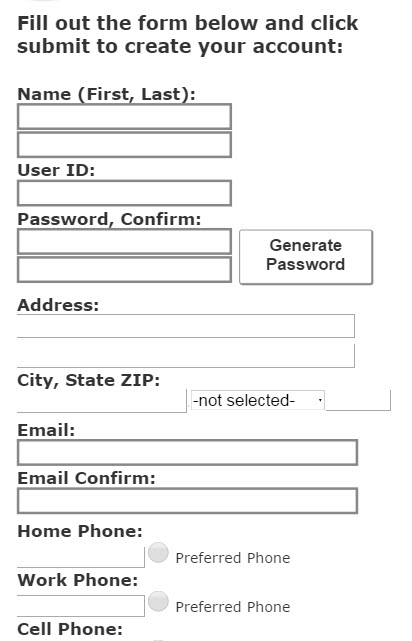
You may customize this form any way you like. You may also change the hidden fields subject and from to customize the email being sent, and email_required and required_fields to determine which fields are required. Separate each required field in the value of the required_fields hidden field with a comma. (If you want to require email but you don't want to have an email confirm field, delete the email_required hidden input, and put "email" in the value of the required_fields hidden input.) It is not necessary to modify the hidden field recipient. The figure on the left is how the form looks normally. The figure on the right depicts what the form looks like in fallback mode when JavaScript is turned off in the browser. Note that the required highlighting automatically kicks in for any field that is in the required_fields hidden field list, but the asterix ( * ) label does not. To have the asterix label show on all the required fields in the case of JavaScript being turned off, simply copy and paste the asterix next to any new fields that are required. It is recommended that if you do not want file upload capability that you delete the file upload row. You may change required and error highlighlighting as well as all other font and button styling from within the CSS editor by working with the Mail Form Styles and the Mail Form Mobile Styles.
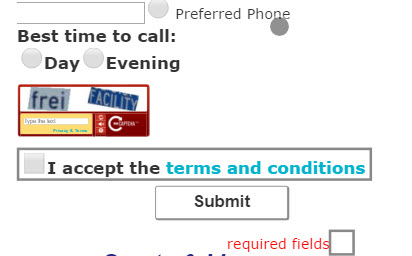
The figure below depics what the form looks like on a cell phone:
After deploying any mail contact form, you will see a new button in the main menu for editing form recipients:

Clicking on this button opens the following console for setting the recipient to each mail form:
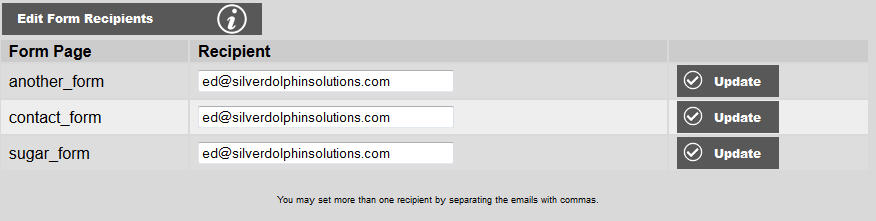
Simply enter the email address next to each form you have that you want the data to be mailed to when someone fill out the form, and click Update. The legacy method of setting the recipient field in the form is still available if you are not concerned about having your recipient email address harvested. Hot tip: To inhibit robots from harvesting your recipient email address, replace the " @ " sign with " +++++ " (5 plus signs). Note: The preferred method is to use the Edit Form Recipients console as shown above because the recipients are completery inaccessible to robots and hackers.
You will also want to create a page named contact_return for display after the form is successfully submitted. (You may change the name of the return page by changing the value of the hidden field redirect if you want to have different return pages for different contact forms.)
If you want to send a message back to the inquirer, create a page named contact_return_message and embed " [FIRST_NAME] [LAST_NAME] " into your page where you want their first and last names to go, i.e. "Dear Joe,". (Note: If you want to show only first name, simply leave out " [LAST_NAME] ".) (You may change the name of the return message page by changing the value of the hidden field html_message_page if you want to have different return messages for different contact forms.)
Above is the stock html message page that is provided as the HTML Contact Return Message plugin. You can use this a a "boiler plate" to create your own HTML message.
The contact form will also store data into a table called contact_form. If you want to change the name of this table (i.e. you have more than one contact forms for different purposes), change the value for the hidden field table_name. (The form mailer creates the table automatically upon first use based upon the fields you have in the form. If you add fields after someone has used the form, the new fields will be added to the table automatically. If you change the fields names, the new field names will be added rather than changing the existing field names. In this case, you or your system administrator will need to revise the table structure manually to match the new form.) Note: The hidden fields used to configure the form mailer, i.e. recipient, required_fields, etc, will not be added to the table with the exception of subject (so that you may use different forms to add to the same table and be able to distinguish the source by the subject).
You may also specify a field to be regarded as unique such as email. To do this, create a hidden field named no_duplicates and give it the value of the name of the field you do not want to allow duplicates for. You may specify multiple fields by using a comma as a delimiter. An example of this is:
<input name="no_duplicates" type="hidden" value="email,userid" />
If someone enters a value that already exists for the field in question, then the form mailer will not add the new record to the table and it will prompt the user to change it.
You can change the colors, fonts, etc. for your contact form using the styles editor by selecting Mail Form Styles from the style sheet list shown it the main menu by clicking Edit Styles. Go to Editing CSS for more information on editing styles.
Some mail servers cannot do MIME mail such as GoDaddy. If you encounter an error similar to Bad parameters to mail() function, mail not sent, try adding the following no_mime hidden field to your form:
<input name="no_mime" type="hidden" value="1" />
For a complete list of hidden-field mail-form directives see Complete List of Form-Mailer Reserved Hidden Fields.
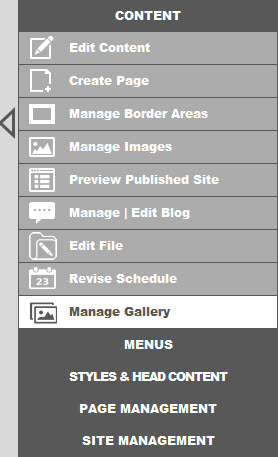
After installing the Lightbox Photo Gallery plugin, a new button will appear under CONTENT
Select this button to access the gallery management console as shown below:
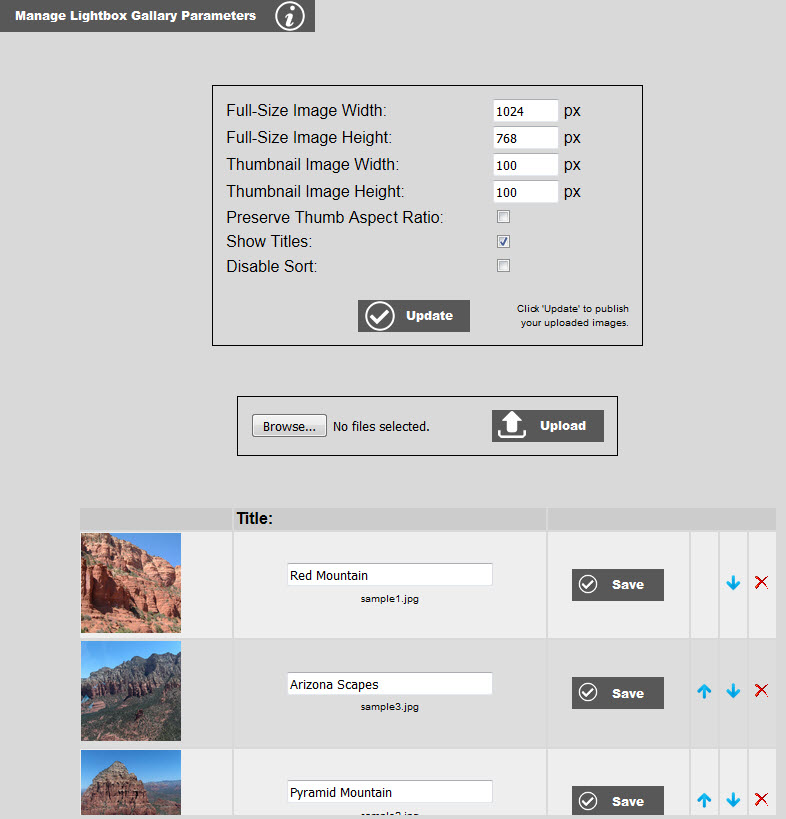
You can upload your images by browsing to the Images on your computer. Then clicking Upload to upload them. Note: You can select a range of image file by holding down the shift key, or any number of image files by holding down the control key. You images will not be published at this point. Only clicking the Update button to save the parameters will re-size and publish your images.
Under the parameter section, you can set the height and width of both the thumbnails and the popup images. Note: The original images are retained even after processing. So you may change the size any time you want without image degradation.
Leaving Preserve Thumb Aspect Ratio unchecked will give all the thumbs the same dimensions regardless of whether or not the images are landscape or portrait. Checking that option will preserve the aspect ratio, but if you have portrait and landscape images, the thumbs will also be this way. If having no gaps on the gallery page is important to you, leave this checkbox unchecked. If you don't like seeing distorted thumbnails more than seeing gaps, then check this checkbox.
Titles are only shown when the Show Titles checkbox is checked. If this checkbox is checked, but not titles assigned, then file names are used less the file extension and with underscores being replaced with spaces.
Checking Disable Sort will display the thumbs in the order that the file system presents them. This is not necessarily an alphabetical sorting. The sort is whatever the file system decides it should be. This can give the appearance of randomized sort. Sometimes the file system goes by date. Note: Linux sorts caps first then lower case. If you don't want to take the time to sort your images and you don't want them to appear sequential, you can try Disable Sort.
You can use the up/down arrows to change the sort of your images. The moved images will be highlighted as shown below:
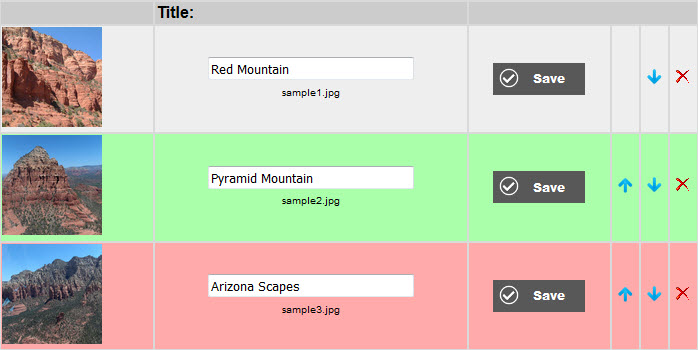
To save the new sort order, just click Save Sort Order.
Manual Method
If for some reason you don't want to use the gallery management console, the old manual methoud is still available. Upload your images for the gallery into the "image" folder.
(/userfile/image/) You can use the image tool for uploading images. In
code view, add the "rel" attribute with a value of "lightbox" to each
image that is to use the Lightbox viewer. i.e. rel="lightbox" The "src"
attribute of the "img" tag points to the thumbnail image, and the "href"
attribute of the "a" tag points to the full-size image.
You may also specify a group of images to create a slide show with
previous and next buttons. In code view, simply enter a group name between
square brackets [] for the "rel" attribute. i.e. rel="lightbox[group].
Upload your image files as jpegs named as "slide1", "slide2", etc to the "Image" folder. Then switch to code view and change "image_cnt" to the number of images in your slide show. You will also want to adjust "img_width" and "img_height" to match the size of your images. You may also want to adjust the "delay".
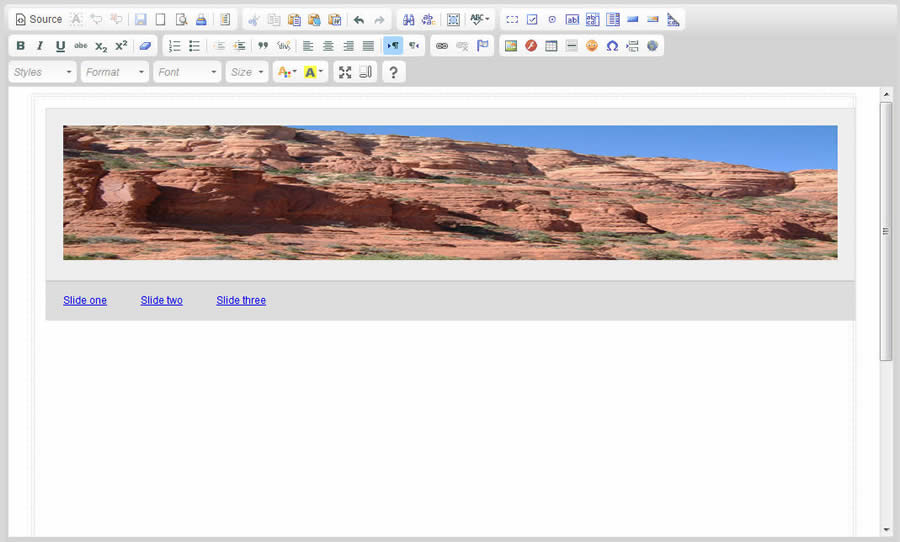
Horizontal Scrolling Slide Show v2
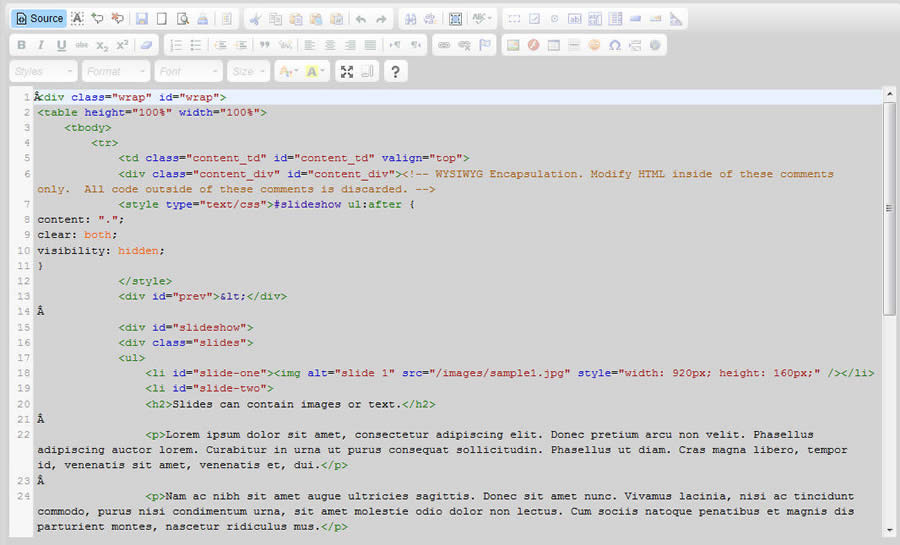
The horizontal scrolling slideshow plugin allows you to add horizotally scrolling slideshows to your website. Creating a page with this plugin brings up a default page as follows:
Each slide is a list item in at un-ordered list. The stock slide shown contains 3 slide. Slides 1 and 3 are pictures, and slide 2 is text. Slide content can include any HTML content you desire.
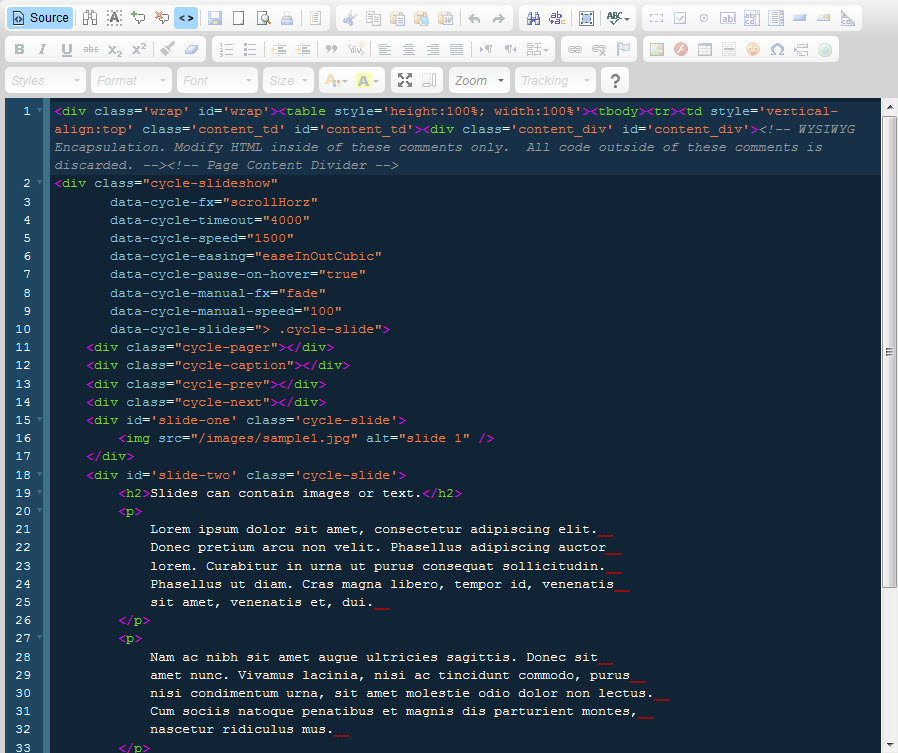
Just add your HTML in each of the slides. To add more slides you will need to do 2 things. First, add another list item <li>your stuff</li> inside the <ul> of the <div class="slides"> div. Next, add another nav link list item <li><a href="#slide-four">Slide 4</a></li>inside of the <ul class="slides-nav"> un-ordered list.
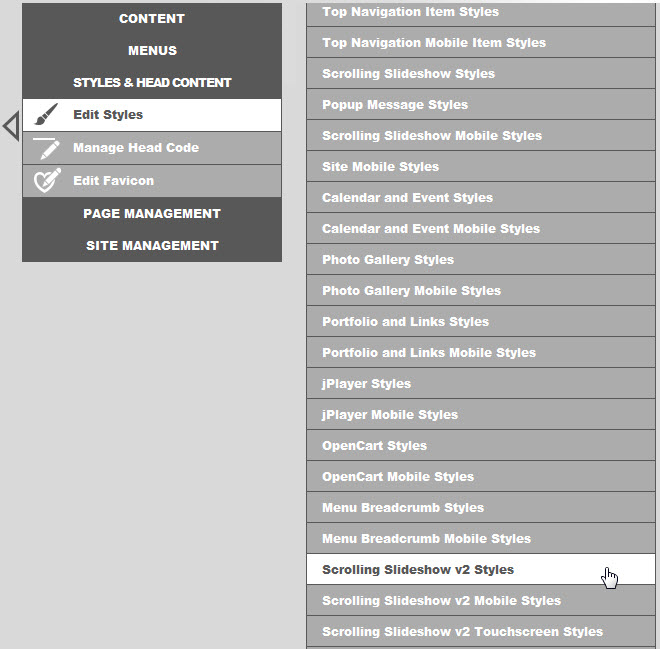
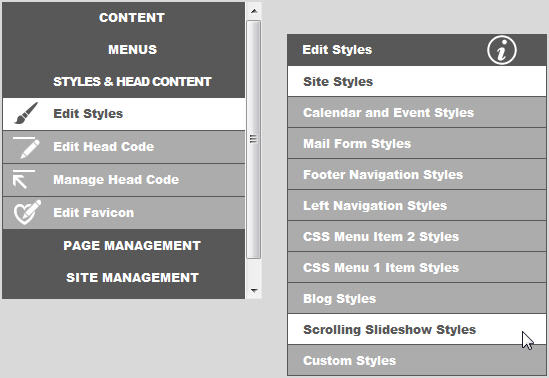
Next, you will want to set the styles on your new slide show. Use the CSS editor to edit the Scolling Slideshow Styles:
You may use the styles editor to unhide them and position them as you wish. You may also repace the characters with images to suit your site's style.
Horizontal Scrolling Slide Show
The horizontal scrolling slideshow plugin allows you to add horizotally scrolling slideshows to your website. Creating a page with this plugin brings up a default page as follows:
Each slide is a list item in at un-ordered list. The stock slide shown contains 3 slide. Slides 1 and 3 are pictures, and slide 2 is text. Slide content can include any HTML content you desire.
Just add your HTML in each of the slides. To add more slides you will need to do 2 things. First, add another list item <li>your stuff</li> inside the <ul> of the <div class="slides"> div. Next, add another nav link list item <li><a href="#slide-four">Slide 4</a></li>inside of the <ul class="slides-nav"> un-ordered list.
Next, you will want to set the styles on your new slide show. Use the CSS editor to edit the Scolling Slideshow Styles:
By default, the previous, next, pause and resume links are hidden. You may use the styles editor to unhide them and position them as you wish. You may also repace the characters with images to suit your site's style. (Note: The pause an resume buttons do not work for version 1 of the slideshow. Use version 2 if you need pause and resume buttons.
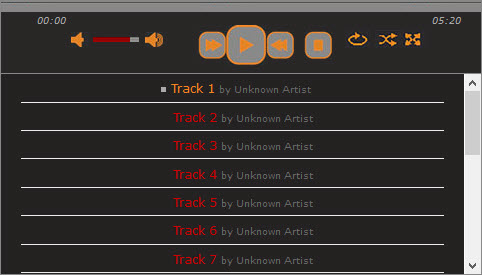
jPlayer Audio, Video, and Multimedia Players
 |
 |
 |
| Audio | Video | Multimedia |
 |
 |
 |
| Audio, Mini | Multimedia, Narrow | Multimedia, Pink Flag |
 |
 |
 |
| Audio, Orange DJ | Audio, Mini, Orange DJ | Multimedia, Orange DJ |
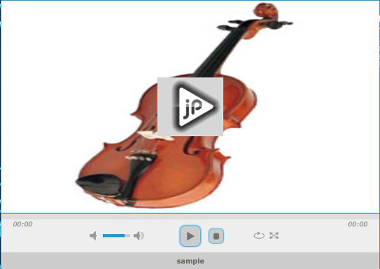
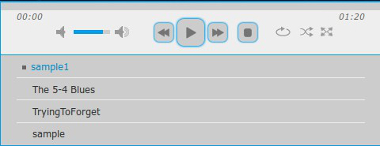
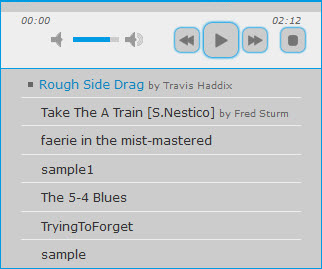
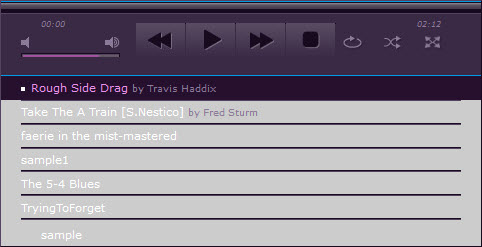
jPlayer is a user and programmer friendly media player. You are able to edit the appearance of your player through styling in the CSS style sheets for this player.
Audio Player, Audio Player Mini
If you are in need of an audio player for a single song or to have individual media players for multiple songs, this is an excellent choice. To put your audio file on this player, simply FTP your audio file to the media folder. Then, go to the head code for the media player and change the audio_title, delete the sample.mp3 file and add your audio file to it's appropriate line for the file type. This is how your head code will initially appear:
<script>
function InitializejPlayer()
{
var media_player = {media_num:"1", media_type:"audio", audio_title:"sample", audio_m4a:"", audio_m4a:"", audio_mp3:"sample.mp3", audio_webma:"", audio_wav:"", audio_fla:"",
audio_rtmpa:"", audio_poster:""};
var result = LoadMedia(media_player);
}
</script>
To have a poster appear with your audio file, FTP your poster to the media file then add the name of your image and type (ex.: image.jpg) after audio_poster in the head code.
To add a second single audio player on the same page, first you must copy and paste the existing HTML. Then change the number suffix of the jquery_jplayer_1 id and the jp_container_1 id. Note: You may use a descriptive name instead of a number for the suffix if you wish, but the first parts must remain as jquery_jplayer_ and jp_container_.
Original player:
<div id="jquery_jplayer_1" class="jp-jplayer"></div>
<div id="jp_container_1" class="jp-audio" role="application" aria-label="media player">
<div class="jp-type-single">
<div class="jp-gui jp-interface">
<div class="jp-controls">
<button class="jp-play" role="button" tabindex="0">play</button>
<button class="jp-stop" role="button" tabindex="0">stop</button>
</div>
<div class="jp-progress">
<div class="jp-seek-bar">
<div class="jp-play-bar"></div>
</div>
</div>
<div class="jp-volume-controls">
<button class="jp-mute" role="button" tabindex="0">mute</button>
<button class="jp-volume-max" role="button" tabindex="0">max volume</button>
<div class="jp-volume-bar">
<div class="jp-volume-bar-value"></div>
</div>
</div>
<div class="jp-time-holder">
<div class="jp-current-time" role="timer" aria-label="time"> </div>
<div class="jp-duration" role="timer" aria-label="duration"> </div>
<div class="jp-toggles">
<button class="jp-repeat" role="button" tabindex="0">repeat</button>
</div>
</div>
</div>
<div class="jp-details">
<div class="jp-title" aria-label="title"> </div>
</div>
<div class="jp-no-solution">
<span>Update Required</span>
To play the media you will need to either update your browser to a recent version or update your <a href="http://get.adobe.com/flashplayer/" target="_blank">Flash plugin</a>.
</div>
</div>
</div>
Second player:
<div id="jquery_jplayer_2" class="jp-jplayer"></div>
<div id="jp_container_2" class="jp-audio" role="application" aria-label="media player">
<div class="jp-type-single">
<div class="jp-gui jp-interface">
<div class="jp-controls">
<button class="jp-play" role="button" tabindex="0">play</button>
<button class="jp-stop" role="button" tabindex="0">stop</button>
</div>
<div class="jp-progress">
<div class="jp-seek-bar">
<div class="jp-play-bar"></div>
</div>
</div>
<div class="jp-volume-controls">
<button class="jp-mute" role="button" tabindex="0">mute</button>
<button class="jp-volume-max" role="button" tabindex="0">max volume</button>
<div class="jp-volume-bar">
<div class="jp-volume-bar-value"></div>
</div>
</div>
<div class="jp-time-holder">
<div class="jp-current-time" role="timer" aria-label="time"> </div>
<div class="jp-duration" role="timer" aria-label="duration"> </div>
<div class="jp-toggles">
<button class="jp-repeat" role="button" tabindex="0">repeat</button>
</div>
</div>
</div>
<div class="jp-details">
<div class="jp-title" aria-label="title"> </div>
</div>
<div class="jp-no-solution">
<span>Update Required</span>
To play the media you will need to either update your browser to a recent version or update your <a href="http://get.adobe.com/flashplayer/" target="_blank">Flash plugin</a>.
</div>
</div>
</div>
The next step is to copy the code in the head in the InitializejPlayer function. Once the code is copied, change the media_num to match the number of the new player. Change the title and audio file to what you want for your second player. For multiple single audio players, your footer code should appear as follows:
Before:
<script>
function InitializejPlayer()
{
var media_player = {media_num:"1", media_type:"audio", audio_title:"sample", audio_m4a:"", audio_m4a:"", audio_mp3:"sample.mp3", audio_webma:"", audio_wav:"", audio_fla:"", audio_rtmpa:"", audio_poster:""};
var result = LoadMedia(media_player);
}
</script>
After:
<script>
function InitializejPlayer()
{
var media_player = {media_num:"1", media_type:"audio", audio_title:"sample", audio_m4a:"", audio_m4a:"", audio_mp3:"sample.mp3", audio_webma:"", audio_wav:"", audio_fla:"", audio_rtmpa:"", audio_poster:""};
var result = LoadMedia(media_player);
var media_player = {media_num:"2", media_type:"audio", audio_title:"sample2", audio_m4a:"", audio_m4a:"", audio_mp3:"sample2.mp3", audio_webma:"", audio_wav:"", audio_fla:"", audio_rtmpa:"", audio_poster:""};
result = LoadMedia(media_player);
}
</script>
Video Player
If you are in need of a video player for a single video or to have individual media players for multiple videos, this is an excellent choice. To put your video file on this player, simply FTP your video file to the media folder. Then, go to the head code for the media player and change the video_title, delete the sample video and add your video file to it's appropriate line for the file type. Set the width of your video. The choices for width are 480 (480px X 270px), 640 (640px X 360px), and full (up to 1080p)This is how your head code should appear:
<script>
function InitializejPlayer()
{
var media_player = {media_num:"1", media_type:"video", video_title:"sample", video_m4v:"sample.mp4", video_ogv:"", video_webmv:"", video_flv:"", video_rtmpv:"", video_poster:"sample.jpg", video_width:"640"};
var result = LoadMedia(media_player);
}
</script>
Multimedia Player, Multimedia Player Narrow
This multimedia player is designed to play multiple files from one player. FTP your media files to the playlist folder located within the media folder. Your playlist is now ready to go! For a second multimedia player, create a playlist2 folder within the media folder and FTP the files for the second playlist. Then, make sure to copy and paste the existing HTML and change the file name within the HTML. You must also alter the array in the head code to reflect the second media player as follows:
<script>
var media_players = new Array();
media_players[0] = {player:"#jquery_jplayer_N", folder:"playlist",
css_selector:"#jp_container_N"};
media_players[1] = {player:"#jquery_jplayer_2", folder:"playlist2",
css_selector:"#jp_container_2"};
</script>
Blue Monday, Pink Flag and Orange DJ Themes, and Custom Styles
These players are may be customized in CSS combined with modifying the included images. The default theme is the Blue Monday theme. The Pink Flag theme is included. To activate the Pink Flag theme, use the CSS editor to edit the jPlayer Styles. Then click on Advanced Styles and un-comment the CSS. You will have to copy these styles to the advanced areas for jPlayer Mobile Styles and jPlayer Touchscreen Styles. The CSS will probably need adjusting for mobile and touchscreen.
You may also create your own styles. The Orange DJ theme is an example done for a site with a black background using red and orange text. The images for this site have been included, but not the CSS. To get the Orange DJ theme, simply start with the Blue Monday theme and change the reference to any background image in the CSS editor to the jplayer/jplayer.orange.dj equivalent. To create your own theme, copy one of the image collections (Blue Monday, Orange DJ or Pink Flag) and change the color theme of the image collection. Then re-assign each of the background images assign in the jPlayer style sheets to the analogous image in your new collection.
You can change the colors, fonts, etc. for any of these forms using the styles editor by selecting Mail Form Styles from the style sheet list shown it the main menu by clicking Edit Styles. Go to Editing CSS for more information on editing styles.

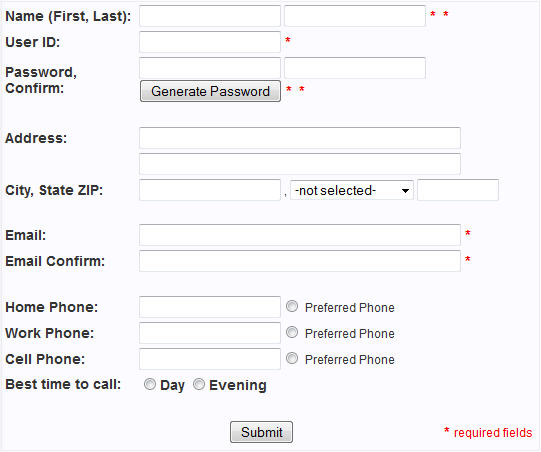
This account creation form is designed to be used in conjunction with the Login Form plugin. You may customize the look of this form if you like, but it must contain the fields UserID, password and password_confirm, and email and email_confirm. You can create as many different account creation pages as you like, and subsequently different user tables. Each account creation page must have a login page associated with it. Each account creation page may have its own login form, or they may all use the same login form. Remember to add user login fields to each of the tables that you intend to use for page-access users. Note: Quite often it is desirable to use the email address as the user ID. To do this, delete the User ID field from the form and add the following hidden field to your form:
<input type="hidden" name="use_email_as_userid" value="1" />
You may customize this form any way you like. You may also change the hidden fields "subject" and "from" to customize the email being sent, and "email_required" and "required_fields" to determine which fields are required. It is not necessary to modify the hidden field recipient. The figure on the left is how the form looks normally. The figure on the right depicts what the form looks like in fallback mode when JavaScript is turned off in the browser. Note that the required highlighting automatically kicks in for any field that is in the required_fields hidden field list, but the asterix ( * ) label does not. To have the asterix label show on all the required fields in the case of JavaScript being turned off, simply copy and paste the asterix next to any new fields that are required. You may change required and error highlighlighting as well as all other font and button styling from within the CSS editor by working with the Mail Form Styles and the Mail Form Mobile Styles.
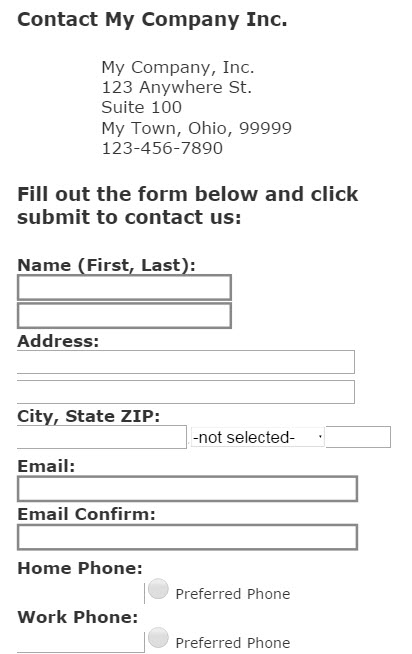
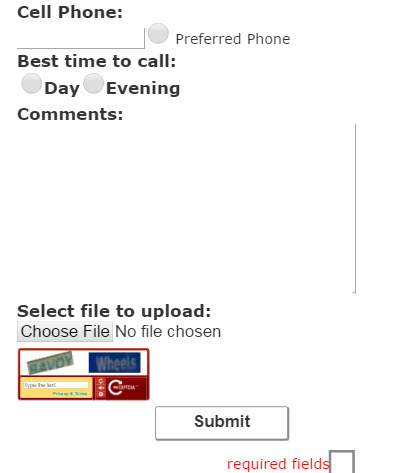
The figure below depics what the form looks like on a cell phone:
After deploying any mail contact form, you will see a new button in the main menu for editing form recipients:
![]()
Clicking on this button opens the following console for setting the recipient to each mail form:
Simply enter the email address next to each form you have that you want the data to be mailed to when someone fill out the form, and click Update. The legacy method of setting the recipient field in the form is still available if you are not concerned about having your recipient email address harvested. Hot tip: To inhibit robots from harvesting your recipient email address, replace the " @ " sign with " +++++ " (5 plus signs). Note: The preferred method is to use the Edit Form Recipients console as shown above because the recipients are completery inaccessible to robots and hackers.
You will also want to create a page named "contact_return" for display after the form is successfully submitted. (You may change the name of the return page by changing the value of the hidden field "redirect" if you want to have different return pages for different contact forms.)
If you want to send a message back to the inquirer, create a page named "account_create_return_message" and embed " [FIRST_NAME] [LAST_NAME] " into your page where you want their first and last names to go, i.e. "Dear Joe,". (Note: If you want to show only first name, simply leave out " [LAST_NAME] ".) (You may change the name of the return message page by changing the value of the hidden field "html_message_page" if you want to have different return messages for different contact forms.)
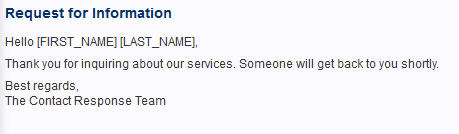
Above is the stock html message page that is provided as the HTML Account Create Return Message plugin. You can use this a a "boiler plate" to create your own HTML message.
The contact form will also store data into a table called "accounts_form". If you want to change the name of this table (i.e. you have more than one contact forms for different purposes), change the value for the hidden field "table_name". (The form mailer creates the table automatically upon first use based upon the fields you have in the form.)
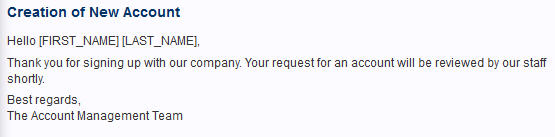
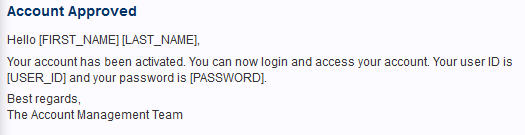
An account will need to be approved before it becomes active. To find out more about this, go to Manage Restricted Pages and Website Users. An HTML message will be sent out upon activation of the new account. There is an HTML New Account Welcome Message plugin that you may use as a boiler plate for creating your message. The stock html message is shown below:
Some mail servers cannot do MIME mail such as GoDaddy. If you encounter an error similar to Bad parameters to mail() function, mail not sent, try adding the following no_mime hidden field to your form:
<input name="no_mime" type="hidden" value="1" />
user_defined_placeholders may be used to add additional placeholders strings may be defined for user fields to be used for personalizing HTML messages that are sent to users filling out forms. The string consists of placeholder string/field name pairs delimited by a colon, in a list separated by commas, i.e.:
[PLACEHOLDER1]:fieldname1, [PLACEHOLDER2]:fieldname2,......etc
Simply assign this string as the value to the hidden field user_defined_placeholders. You may use anything you want inside of the [ ] brackets to match up to the field names they are paired with. All caps are not necessary, but it is a good convention to make it easier to identify your placeholders inside of your HTML message page.
The conditional placeholders of [IF], [EQ]/[NE]/[GT]/[LT], [ECHO] and [ENDIF] are available for conditionally switching content in or out of your HTML messages based upon field values. As an example, suppose you have the user defined placeholders defined in your form as shown below:
<input type="hidden" name="user_defined_placeholders" id="user_defined_placeholders" value="[ADDRESS]:address,[CITY]:city,[STATE]:state,[ZIP]:zip" />
You may not want to show certain text in your HTML message if certain fields are left blank. You can put this text on your HTML message:
[IF] [ADDRESS] [NE] [ECHO] Address: [ADDRESS] [ENDIF]
[IF] [CITY] [NE] [ECHO] City: [CITY] [ENDIF]
[IF] [STATE] [NE] [ECHO] State: [STATE] [ENDIF]
[IF] [ZIP] [NE] [ECHO] Zip code: [ZIP] [ENDIF]
Without the use of conditional switching, the message might look like:
Address:
City:
State:
Zip code:
which may be undesirable. But with conditional switching the message will be blank if a user does not fill in any address information. If the user enters a complete address of 1234 Fairmount Blvd, Cleveland Heights, Ohio 44118, then the HTML email message will be:
Address: 1234 Fairmount Blvd
City: Cleveland Heights
State: Ohio
Zip code: 44118
The availble comparators are as follows:
[EQ] = equals
[NE] <> not equals
[GT] > greater than
[LT] < less than
For a complete list of hidden-field mail-form directives see Complete List of Form-Mailer Reserved Hidden Fields.
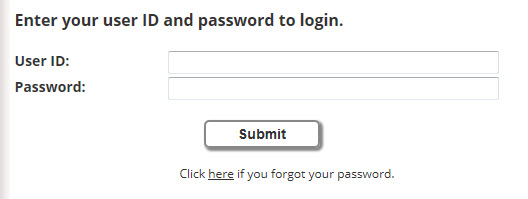
This login form is designed to be used in conjunction with the Account Creation Form plugin. You may customize the look of this form if you like, but the field names cannot change. You can create as many different login pages as you like to be used with different account creation forms, and subsequently different user tables. The only requirement is that the name of the page must contain "login" to be assignable in the Manage Page Access console. Also remember to add user login fields to each of the tables that you intend to use for page-access users. Your login page should be assigned to every access-controlled page that is to be accessed via this login.
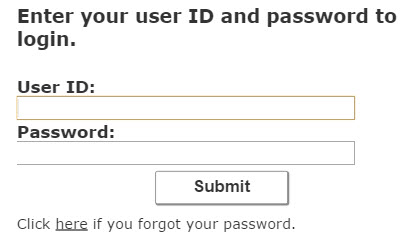
The figure below depics what the form looks like on a cell phone:
Clicking the "Click here if you forgot your password." link will show the user the form shown below which will cause the system to generate an new password and send it to the email (if the account
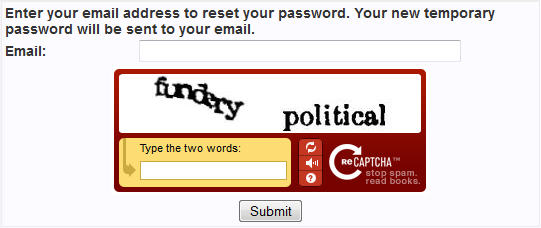
The password reset form also includes a reCAPTCHA validator from Google. It will not be visible until you have changed the public and private keys in the /connect/captchakeys.php file. You can obtain a set of keys from http://www.google.com/recaptcha You may also need to manually update the source of the reCAPTCHA script and the source of the noscript iframe. To do this, look for http://www.google.com/recaptcha/api/challenge?k=xxxxxxxxxxxxxxxxxxxxxxxxxxxxxxxxxxxxxxxxxxxxxxxxx and http://www.google.com/recaptcha/api/noscript?k=xxxxxxxxxxxxxxxxxxxxxxxxxxxxxxxxxxxxxxxxxxxxxxxxx and replace xxxxxxxxxxxxxxxxxxxxxxxxxxxxxxxxxxxxxxxxxxxxxxxxx with the public key you obtained from Google.
By default, the hidden field captcha_type is set to recaptcha for using the reCAPTCHA API version 1 validator from Google.. Alternatively, you may usea reCAPTCHA API version 2, WS CAPTCHA or Mollom CAPTCHA by changing the value of the hidden field captcha_type from recaptcha to recaptcha2, wscaptcha or mollom respectively.
reCAPTCHA API version 2
captcha_type = recaptcha2
You will need to obtain a site key and a secret key from Google at https://developers.google.com/recaptcha/
These keys need to be placed in /connect/captchakeys.php as shown below:
<?php
//////////////////////////////////////////////////////////
// This file contains the public and private keys to operate Google's reCAPTCHA code used in the reset password-function for the public side of your site.
// You will need to go to http://www.google.com/recaptcha to obtain a pair of keys for your site.
//
// reCAPTCHA API V2
define('RECAPTCHA_SITE_KEY', 'put_the_site_key_here');
define('RECAPTCHA_SECRET', 'put_the_secret_key_here');
// reCAPTCHA API V1
define('RECAPTCHA_PUBLIC_KEY', '6LeGudMSAAAAAOkRJtut9PVOFIxedHgutbY-i1XT');
define('RECAPTCHA_PRIVATE_KEY', '6LeGudMSAAAAAPyGPjLnAay4i85v1qL5xFV6KdSM');
// Mollom CAPTCHA
define('MOLLOM_PUBLIC_KEY', '');
define('MOLLOM_PRIVATE_KEY', '');
?>
WS CAPTCHA
captcha_type = wscaptcha
The WS CAPTCHA validator from Web Spam Protect will not be visible until you purchase and download the PHP CAPTCHA form http://webspamprotect.com/.
Mollom CAPTCHA
captcha_type = mollom
The CAPTCHA validator from Mollom will not be visible until you
have changed the public and private keys in the
/connect/captchakeys.php file. You can obtain a set of keys
from https://mollom.com/
These keys need to be placed in /connect/captchakeys.php as shown below:
<?php
//////////////////////////////////////////////////////////
// This file contains the public and private keys to operate Google's reCAPTCHA code used in the reset password-function for the public side of your site.
// You will need to go to http://www.google.com/recaptcha to obtain a pair of keys for your site.
//
// reCAPTCHA API V2
define('RECAPTCHA_SITE_KEY', '');
define('RECAPTCHA_SECRET', '');
// reCAPTCHA API V1
define('RECAPTCHA_PUBLIC_KEY', '6LeGudMSAAAAAOkRJtut9PVOFIxedHgutbY-i1XT');
define('RECAPTCHA_PRIVATE_KEY', '6LeGudMSAAAAAPyGPjLnAay4i85v1qL5xFV6KdSM');
// Mollom CAPTCHA
define('MOLLOM_PUBLIC_KEY', 'put_the_public_key_here');
define('MOLLOM_PRIVATE_KEY', 'put_the_private_key_here');
?>
You can set the action of the forms as well as the value of the redirect hidden field if you do not want to rely on the JavaScript at the bottom of this page to set it for you.

This change password form is provide in conjunction with the Account Creation Form plugin and the Login Form plugin to give your users the ability to enter their own password. They can also use the Generate Password button to have the system automatically generate a secure password for them. You may customize the look of this form if you like, but it must contain the password and password_confirm fields, and and the UserID hidden field. Do not add other fields to this form as they will not be used. Obviously, this form must require login as this page will have no idea what account password to change without the user being logged in.
The figure below depics what the form looks like on a cell phone:

This table contains all of the hidden field names that have special functionality when used with the form mailer. The form mailer is used by following plugins:
| Name | Values | Description | Required | Form(s) | ||||||||||
| recipient | text --- email address | Email address of where form information will be sent to. (To deter robot email harvesting, replace @ with +++++.) | Y | contact, account create | ||||||||||
| redirect | text --- URL | URL that the webpage will be redirected to after form mailer completes mailing. | Y | all | ||||||||||
| redirect_not_local | 0 or 1 | If exists and is set to 1, then form_processor.js will not make any attempt to adjust the path based on config file path settings. If you do have a remote address for your redirect, you must set this to 1. Otherwise your remote address will be parsed and converted into a local address. | N | all | ||||||||||
| subject | text | Subject of email going to recipient. | Y | all | ||||||||||
| reply_to | text --- email address | Reply-to address for email sent to recipient. Could be used by administrator of contact-form requests to send copy to another address upon approval or other reason. | N | all | ||||||||||
| set_reply_to_as_email | 0 or 1 | If set to 1, then the email addresses provided by the user will be used for the Reply-to address for email sent to recipient instead of reply_to. If set to 0 or not set at all, then reply_to will be used as stated above. | N | all | ||||||||||
| from | text --- email address | From address for email sent to recipient. Used to label mail-form emails. If not provided, the following default will be used: Mail Request Form <$email> where $email is the <$email> entered from the requester. | N | all | ||||||||||
| required_fields | text --- comma-separated list | List of field names separated by commas that must have non-blank entries (required fields). If any of these fields are left blank, the form mailer will prompt user to enter the missing field(s). | N | contact, account create | ||||||||||
| email_required | 0 or 1 | Requires not only that the email field be non-blank, but also that the email_confirm field be non-blank and match the email field. This overrides the required_fields directive for email. Note: If for some reason you want to require email but not make the user confirm the email (not recommended), then just add email to the required_fields list. (Omitting this field is the same as setting it to 0.) | N | contact, account create | ||||||||||
| use_classic_required_field_marks | 0, 1 or 2 | Instructs the form processor to skip the hiding of the asterisk marks after required fields and the adding of border styles to the required fields. Set to 1 to use classic required field marks, 0 to use styled field borders, and 2 to use asterisks and styled field borders. (Omitting this field is the same as setting it to 0.) | N | contact, account create | ||||||||||
| html_message_page | text --- page name | Page used to construct email sent to user's email address entered
in the email field. The following
reserved strings will be replaced with user-entered data:
|
N | contact, account create | ||||||||||
| user_defined_placeholders | text --- comma-separated list of colon-separated (placeholder string/field name) pairs |
Additional placeholders strings may be defined for user fields to
be used for personalizing HTML messages that are sent to users
filling out forms. The string consists of placeholder string/field
name pairs delimited by a colon, in a list separated by commas,
i.e.:
[PLACEHOLDER1]:fieldname1, [PLACEHOLDER2]:fieldname2,......etc |
N | contact, account create | ||||||||||
| table_name | text --- MySQL table | Name of MySQL table to store records of each mail-form post. If the table does not already exist, it will be created with the fields in the post (less most of the hidden fields that would be of no interest for data collection). If new fields are added to the form after the table has already been created, these new fields will automatically be added to the table structure. If table_name is not provided, then no data collection will occur. | N | contact, account create | ||||||||||
| no_duplicates | text --- comma-separated list | Comma-separated list of fields names for which there should be no duplicate entries in the database table as named by table_name. If the value for any of the fields in this list are found in the table, the form mailer ceases execution and prompts the user to re-enter their information. | N | contact, account create | ||||||||||
| ignore_fields | text --- comma-separated list | Comma separated list of fields names to be ingnored when the form processor is creating or modifying the data collection table as named by table_name. | N | contact, account create | ||||||||||
| longtext_fields | text --- comma-separated list | Comma separated list of fields names to be created as long text fields when the form processor is creating or modifying the data collection table as named by table_name. | N | contact, account create | ||||||||||
| update_record | 0 or 1 | If set to 1, then update an existing record in the table specified by table_name rather than inserting a new record. This is useful for updating account information when a user has already logged in. | N | contact, account create | ||||||||||
| update_record_key | text | Name of key field to use in the WHERE clause for updating record. This field is used in conjunction with the update_record field. The WHERE clause will look for record that has this key field equal (=) to that of the one set in the form. If this field is not set, then UserID will be assumed to be the key field. If both this field and UserID are not set, then email will be assumed to be the key field. If no match is found, then the update will fail. | N | contact, account create | ||||||||||
| password_required | 0 or 1 | Requires not only that the password field be non-blank, but also that the password_confirm field be non-blank and match the password field. Note: For passwords, password_required should be used and NOT required_fields. (Omitting this field is the same as setting it to 0.) | N | account create | ||||||||||
| password_length | integer | Minimum number of characters allowed for password. | N | account create | ||||||||||
| password_strength | text ---medium or high | Password strength. medium = password must contain both letters and
numbers high = password must contain letters, numbers and symbols |
N | account create | ||||||||||
| use_email_as_userid | 0 or 1 | When using the Account Creation Form plugin, you may elect to delete UserID field and simply use the user's email address instead. Setting use_email_as_userid to 1 will cause the email field to be substituted for the UserID field. (Omitting this field is the same as setting it to 0.) | N | account create | ||||||||||
| replace_single_quotes | 0 or 1 | Tells insert/update table record function to replace single quotes with HTML ampersand code for single quote ( ' ) instead of using backslash code if set to 1. (Omitting this field is the same as setting it to 0.) | N | contact, account create | ||||||||||
| html | 0 or 1 | Setting html to 1 will cause messages to sent as HTML. Setting html to 0 will cause messages to be sent as text. Note: This only affects the message being sent to the contact/form mailer manager as defined by the recipient field. Messages constructed using the html_message_page are always sent in HTML unless overridden by the octet_stream field. (Omitting this field is the same as setting it to 0.) | N | all | ||||||||||
| no_mime | 0 or 1 | Setting no_mime to 1 will cause messages to be sent without MIME. The header information will be included separately instead of as part of the body of the message. This is necessary on some servers such as GoDaddy hosting, which do not support MIME encoding. Setting no_mime to 0 will allow the mailer to default to MIME encoding. Note: MIME encoding is generally required for sending attachments. (Omitting this field is the same as setting it to 0.) (If uploading one or more files no_mime will be ignored and MIME will be used.) | N | all | ||||||||||
| html_msg_as_text | 0 or 1 | Setting html_msg_as_text to 1 forces the message sent to the form user as defined by html_message_page as plain text. Setting html_msg_as_text to 0 allows this message to be sent as HTML (default). (Omitting this field is the same as setting it to 0.) | N | contact, account create | ||||||||||
| use_captcha | 0 or 1 | If set to 1 or anything not 0 then display CAPTCHA verification. If not set or set to 0, then do not display CAPTCHA verification. (CAPTCHA is a test to determine if user is a human being or a robot.) | N | contact, account create, reset_password | ||||||||||
| alt_go_back | text --- page name or URL | If set, then go back to page (as value of alt_go_back) with all POST vars sent as GET vars. This is used to re-populate fields with user input such that user will not have to re-type all of their info upon form error such as CAPTCHA not typed in correctly. | N | all | ||||||||||
| redirect_err_to_src | 0 or 1 | Causes form processor to redirect back to form if a form entry error has occured. An error code is sent back to the form as a GET var with the name err. See table of error codes below for more information. | N | all | ||||||||||
| email_link_page | text --- page name | Page to link to in email sent by the password reset and password change forms. Note: The site domain is automatically included in the link; therefore, only assign the page name with .php extension and no leading slash. | N | login_form (reset_password) | ||||||||||
| recaptcha_challenge_field | text | Used by reCAPTCHA. Code representing desired response. | N | contact, account create, password_reset | ||||||||||
| recaptcha_response_field | text | Used by reCAPTCHA. Response entered by user. | N | contact, account create, password_reset | ||||||||||
| captcha_type | text |
CAPTCHA type. recaptcha = reCAPTCHA, recaptcha2
= reCAPTCHA API version 2, wscaptcha = PHP
CAPTCHA, mollom = Mollom Note: reCAPTCHA API version 2 requires registration of your domain You can obtain a key-pair here: https://www.google.com/recaptcha/admin#list Note: wscaptcha requires purchase of PHP Captcha from http://webspamprotect.com/ Note: Mollom CAPTCHA requires public and private keys. You can obtain keys at https://mollom.com/ |
N | contact, account create, password_reset | ||||||||||
| wsp_code | text | Used by PHP CAPTCHA. | N | contact, account create, password_reset | ||||||||||
| mollom_session | text | Used by Mollom CAPTCHA. Populated automatically by plugin code. | N | contact, account create, password_reset | ||||||||||
| max_url | integer | Maximum number of URL's that can be found on form before failing silently. -1 or not set disables this feature. SPAM robots tend to inject URL's of infected websites into forms. This feature is used to protect against SPAM robots. | N | contact, account create | ||||||||||
| uploads_dir | text | Path to store uploads to. If not defined, then it defaults to uploads. This folder is generally not important unless store_uploads_instead is set because the images will be deleted off of the server after being emailed. See below. | N | contact | ||||||||||
| store_uploads_instead | integer | If set to 1, files will be left on the server in the folder defined by uploads_dir. If uploads_dir is not defined, the file(s) will be stored in uploads. If not set or set to 0, files will be emailed to teh recipient, then removed from the server. | N | contact | ||||||||||
| allowed_file_ext | text --- comma-separated list | Comma-separated list of file extensions that are allowed for attachments or file uploads. Example: "jpg,jpeg,png,gif" for web images only. | N | contact | ||||||||||
| attachment_application | text | Application used to open attachment. Not set (default) is octet-stream which allows recipient to choose any application on their system. For a list of MIME application types, click here. | N | contact, account create | ||||||||||
| image_width | integer | Maximum width to scale image to. If not set, width will default to 1,000,000 px to effectively turn of width limiting. Note: Either image_width and/or image_height must be set to activate image scaling. | N | contact | ||||||||||
| image_height | integer | Maximum height to scale image to. If not set, height will default to 1,000,000 px to effectively turn of height limiting. Note: Either image_width and/or image_height must be set to activate image scaling. | N | contact | ||||||||||
| preserve_aspect_ratio | 0 or 1 | If set to 1, image will be scaled proportionally preserving aspect ratio. If set to 0, image will scale to both max_width and max_height ignoring aspect ratio. If not set, scaling will default to preserving aspect ratio (1). Either image_width and/or image_height must be set to activate image scaling. | N | contact | ||||||||||
| formmail_addon | text | Name of module file to include in form processor module. Provided as a method to add plugin funtionality not covered by Breeze form processor. Note: formmail_addon module must be in the same folder as the Breeze form processor (formmail.php) which is the lib folder (/php by default). |
N | contact, account create | ||||||||||
| form_page | text | Name the of page that has the form that you are configuring. Used by View Form Tables to detirmine where to get the form for editing records. Set hidden field update_record to 1 and set hidden field update_record_key to the key field for the table. | N | contact, account create | ||||||||||
| The following reserved hidden fields are generally not necessary. They are provided for expert use under special circumstances. | ||||||||||||||
| charset | integer |
Character set to use for text encoding.
1 - UTF-8 |
N | contact, account create | ||||||||||
| encode_type | integer |
Encoding of attachements.
1 -- 7bit |
N | contact, account create | ||||||||||
| transfer_encoding | integer |
Transfer encoding of attachments.
7 - 7bit |
N | contact, account create | ||||||||||
If redirect_err_to_src is set to 1, the form processor will redirect the browser back to the form passing an error code as a GET var with the name err. You can create JavaScript to handle the errors by displaying a message and/or highlighting the field that requires correction. Below is a list of error codes:
| Code (err) | Description | Form(s) | Error Div |
| required | A required field has not been filled in. An additional GET var with the name field is also passed which is intended for further customization of the the error message and/or hightlighting of the field that needs to be filled in. | contact, account create | ErrRequired |
| duplicate | An entry in the database already exists for a field that does not allow duplicates as specified by no_duplicates. An additional GET var with the name field is also passed which is intended for further customization of the the error message and/or hightlighting of the field that needs to be changed. | contact, account create | ErrDuplicate |
| captcha | The CAPTCHA has not been filled out correctly. | contact, account create, password reset | ErrCaptcha |
| The email field has not been filled out or it does not match the email confirm. | contact, account create | ErrEmail | |
| bad_email | The email entered is not a valid email address, i.e. missing @ or no domain suffix. | contact, account create | ErrBadEmail |
| no_match | The password is blank or does not match the password confirm. | account create, change password | ErrNoMatch |
| too_short | The password does not meet the minimum length as set by password_length. | account create, change password | ErrTooShort |
| too_weak | The password does not meet the minumum strength as set by password_strength. An additional GET var password_strength is also passed which is intended for further customization of the the error message. | account create, change password | ErrTooWeak |
| bad_user | User is not found. | login | ErrBadUser |
| bad_password | Password does not match the one in the record for the user. | login | ErrBadPassword |
| bad_access_level | The user that is trying to log in does not have the necessary access level. | login | ErrAccessLevel |
| not_active | The user that is trying to log in has not been activated or has been de-activated. | login | ErrNotActive |
| password_reset | A password reset has been requested. The temporary password has been sent to the user's email. | login | PasswordReset |
| file_size | The file that is being attached is too big to send in the email. | contact | ErrFileSize |
| file_type | The type of file that is being sent is not allowed. | contact | ErrFileType |
| upload | There was some error while trying to upload the file. | contact | ErrUpload |
| bad_phone | The phone number does not match any known phone formats. Allowable formats are: ###-###-####, ####-###-###, (###) ###-###, (###)###-###, ####-####-####, ##-###-####-####, ####-####, ###-###-###, #####-###-###, ##########, #-###-###-####, #-####-###-###, # (###) ###-###, #(###)###-###, #-####-####-####, #-##-###-####-####, #-####-####, #-###-###-###, #-#####-###-###, ###########, ##-###-###-####, ##-####-###-###, ##-####-####-####, ##-##-###-####-####, ##-####-####, ##-###-###-###, ##-#####-###-###, ############ |
contact, account create | ErrPhone |
| img_resize | There was an error resizing your image | contact | ErrImgResize |
Upon creating the first contact mail form page or account creation page, the button below will appear under SITE MANAGEMENT.
![]()
Clicking on this button will cause the console shown below to appear:

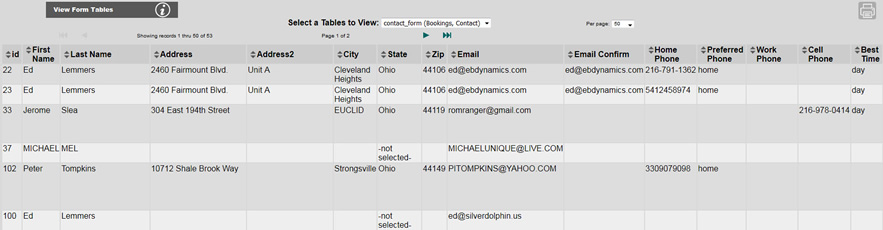
When you select a table from the list, the table will be displayed as shown below. You will be able to browse all of the records creating by anybody who has ever filled out any of your mail forms.
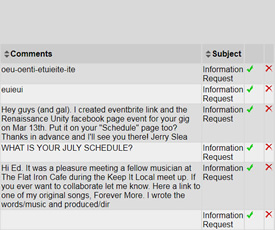
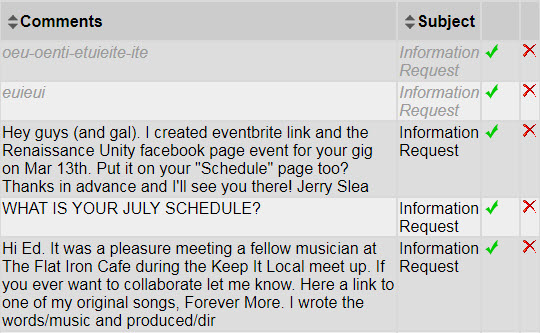
You may prune records using the ![]() icon. This can be useful if spambots somehow manage to break around the CAPTCHA and load up your table with junk messages. You may also marked messages as "read" using the
icon. This can be useful if spambots somehow manage to break around the CAPTCHA and load up your table with junk messages. You may also marked messages as "read" using the ![]() icon. Clicking the check icon will display read messages as grayed out and italic.
icon. Clicking the check icon will display read messages as grayed out and italic.
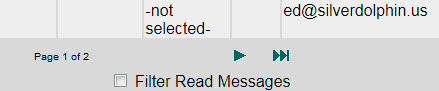
To filter out messaged that have already been read, click the Filter Read Messages checkbox.
If you want to print out the table, click and print button shown below and set the page orientation to landscape:
![]()
The Manage Zen Cart button may be disabled by default.
To enable it, go to Manage Users and Site Options. Click
on Change Site Options, check the box for Enable
Zen Cart and click Submit. Then click the Manage
Zen Cart button and login in as:
| User ID | Password |
| manager | man123 |
Go to Tools/Admin Settings. Click the reset pwd
button and change your password.
Note: The Zen Cart is no longer available as a plugin during the create-page process as of version 2.1.3. It has been superceded with a Zen Cart default template that utilizes the top and bottom border areas from the Breeze Website Builder. To use it, simply point your menu item or link to /shoppingcart/. This method avoids the pitfalls of an iframe plugin as described below. You may also make the shopping cart your default page. To do this, simply move the entire Zen Cart file tree to directly in the web root folder, and modify the configure.php files in the include folders (one for the catalog, and one for the management pages). To learn more about using the Zen Cart with the Breeze Website Builder, click here.
Note: If using plugin (versions 2.1.2 and earlier): We no longer recommend the use of the Zen Cart plug-in for creating a shopping cart page for most instances because it places the cart into an iframe. Doing this has two deleterious effects:
In some cases where (a) you are not using a payment gateway and (b) SEO of your cart contents is not vital (or at least not vital enough to warrant learning how to customize a Zen Shopping Cart), then using this plug-in can save you a lot of time. But we generally recommend that instead you link your menu directly to the shopping cart. You can do this by putting /shoppingcart/ for the URL for your menu item. See the Zen Cart tutorials for more information about customizing templates so you will be able to match the look of your site.
Click here for Zen Cart tutorials.
Click Create to create your page and start adding content. Note: If you are using a plugin such as the calendar plugin, you want not want to add any more content in which case you may want to just return to the main menu. Go to editing content to see more about editing your new page.