![]()
![]()
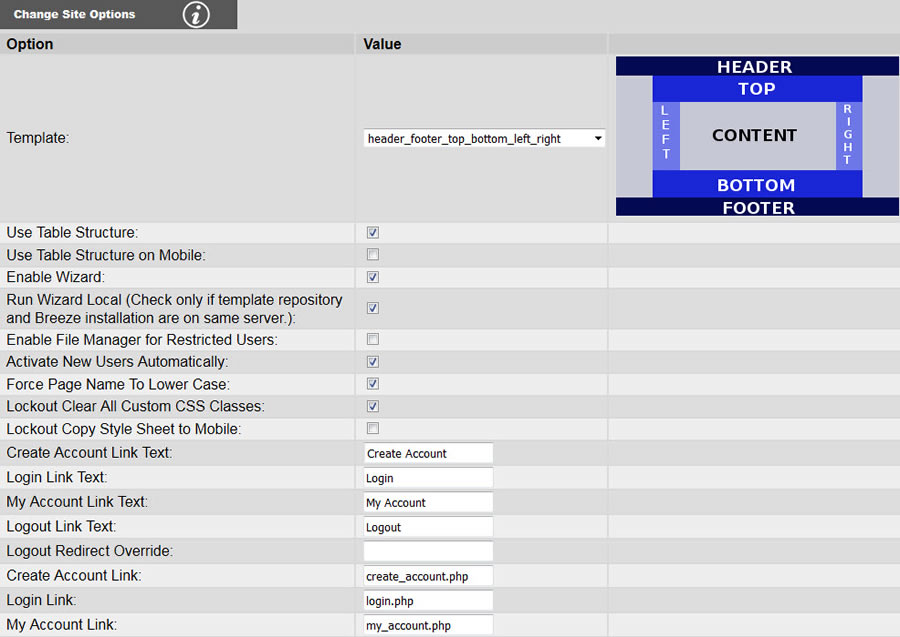
The option management console is shown above. The options are defined as follows:
Template: Allows you to select the default border-area layout for your site. This default can be overridden when creating pages by selecting the template at that time. See selecting layout for more information on this.
Use Table Structure, Use Table Structure on Mobile: As of version 5.4.0, having the page laid out by a table structure within the page file to locate the top, bottom, left, right and content areas can be either on or off. Furthermore, the pages automatically know whether or not they are being viewed on a mobile device. This allows you to switch table structures on or off differently on a mobile device from what you want to do on an office device. The table structures make it easy to control where the top, bottom, left and right areas are mainly because there is nothing to do but set the widths, heights and maybe the margins and paddings. But use of tables for anything other that displaying a "table" is now considered poor practice because the div structure includes many more attributes offering more control over the appearance, especially since the adoption of HTML 5. You can use these settings to turn off the table structures and work only with the top, bottom, left and right divs. Of course you will need to use the style editor to position the divs, particularly the right div. This approach also lets you build a site that will wrap on a mobile device. For more information building a site to work on both mobile and office devices, click here.
Enable Wizard: Enables and disables the Re-run Wizard button. This is interceded to keep non-admin users from inadvertently deleting your website.
Run Wizard Local (...): If you have purchased the Breeze Website Builder subscription and you have also purchased an EB Dynamics hosting package, then you can run the wizard locally. This eliminates the need to download and upload a template, and it also gives you access to all of the templates for free. Do not check this box if you are hosting on another server as the repository will not be locally available and the wizard simply won't be able to connect. Also, you may want to keep this button unchecked as an added safety feature for Breeze Website Builder subscribers with EB Dynamics hosting if you want to ensure that your completed site content is not accidentally erased by inadvertently running the wizard.
Enable File Manager for Restricted Users: By default, restricted users will not be allowed to upload any files. If for some reason you want to give restricted users the ability to add pictures and so forth to particular pages, you can check this box.
Activate New Users Automatically: This option is used in conjunction with the Manage Page Access options. By default, when a user signs up for an account, they will not be granted access to any restricted pages until a site manager approves their account. By checking this checkbox, users can automatically be approved for page access. This is useful if you have pages that you are willing to share as long as the user is willing to provide some information about themselves. This can be very handy as a marketing tool. See managing restricted pages and website users for more information on this.
Force Page Name To Lower Case: When checked all page names will be converted to lower case. It is generally recommended that page names are lower case as Linux web servers are case sensitive and this could make it difficult for Windows-oriented users to manually enter in the URL.
Lockout Clear All Custom CSS Classes: By default this button is checked. Un-checking this button will cause the Clear All Custom CSS Classes button to appear under the admin functions select console. This button is intended only for template developers to use when they need to clear out an old site to build a new template. See clear all custom CSS classes for more information on this.
Lockout Copy Style Sheet to Mobile: Checking this button will hide the Copy Style Sheet to Mobile button in the edit CSS select console. After one has invested some time into developing mobile styles for their website, it is recommended to check this checkbox to prevent accidentally overwriting mobile style sheets with desktop style sheets. For more information on copying desktop style sheets to mobile, see setting up site for mobile.
Create Account Link Text, Login Link Text, My Account Link Text, Logout Link Text: These fields contain the text that is shown in the modal login/logout/create account/my account links that may be shown using the Manage Page Access console. The default values for these are Create Account, Login, My Account and Logout.
Logout Redirect Override, Create Account Link, Login Link, My Account Link: These fields contain the URLs that the corresponding links go to in the modal login/logout/create account/my account links that may be shown using the Manage Page Access console. In the case of the Logout Redirect Override, this is actually the final destination that the user lands on when logging out as the link actually runs thru the logout function transparently. The default values for these are login.php (when left blank), create_account.php, login.php and my_account.php. You will need to change these if you have named your user access pages differently.
For more information on the modal login/logout/create account/my account links see manage restricted pages and website users.
Checking Minify Javascript on Save and Minify CSS on Save will cause either of these types of files to automatically be minified each time after the publish operation. This eliminates the need to manually minify these files using the Minify Files console. For more information on minification, see minifying files.
How to Handle File Exists Error When Creating Pages: This option was added to aid with the multi-site editing feature added in version 6.6.0. For more information on managing multiple sites with one Breeze installation, see Setting up the Breeze Website Builder™ to Edit Multiple Sites In One Account. By default, Disallow Creation of Page is set which throws an error and halts the process whenever a page file of the page that is being created is found. Obviously this would make it nearly impossible to reuse the same web page folder between sites. By selecting either of the other two options you will be able to proceed with creating same-name pages or your new site. You may select Keep Existing Page File and Continue to prevent overwriting the existing files. Normally this should be fine; however, if your page files were created in a Breeze version prior to 6.6.0, it will be necessary to overwrite the files with a newer version of the page-template layout file to take advantage of the ability to see the new site without it being active. To do this change the option to Overwrite Existing Page File and Continue.
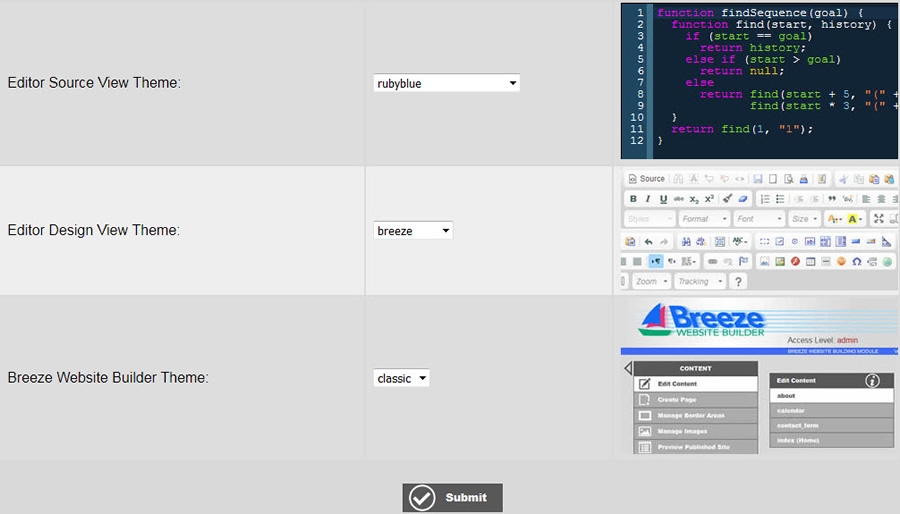
Editor Source View Theme: Allows you to select different coding color themes when using the editor in code view. This setting works across the board for all code editors, Edit Page, Edit Border Area, Edit File, Edit Custom CSS and Edit Head. These selections are purely cosmetic. Choose whichever color scheme is most comfortable to your eyes.
Editor Design View Theme: Allows you to select different button themes when using the editor in design view. This setting works across the board for all editors, but design view and code view offer different button selections. Current selection is between breeze skin (default made up of combination of kama, an old CKEditor version 3 skin and moona-lisa), kama skin (current CKEditor default skin), and moona-lisa skin. Let us know if there is a particular skin you prefer and we will add it.
Breeze Website Builder Theme: Allows you to select different color/styling theme for your Breeze Website Builder experience. As of this writing, there is only one choice. We welcome any theme contributions you may have.